Sony VPL ES2 User Manual
Sony VPL ES2 - SVGA LCD Projector Manual
 |
UPC - 027242648760
View all Sony VPL ES2 manuals
Add to My Manuals
Save this manual to your list of manuals |
Sony VPL ES2 manual content summary:
- Sony VPL ES2 | User Manual - Page 1
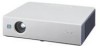
2-148-435-11 (1) Data Projector Operating Instructions VPL-CS7 VPL-ES2 © 2004 Sony Corporation - Sony VPL ES2 | User Manual - Page 2
this product, you may call: Sony Customer Information Service Center 1-800-222-7669 or http://www.sony.com/ The number below is for FCC related matters only. Declaration of Conformity Trade Name: SONY Model No.: VPL-CS7/VPL-ES2 Responsible Party: Sony Electronics Inc. Address: 16450 W. Bernardo - Sony VPL ES2 | User Manual - Page 3
als klein chemisch afval (KCA). The socket-outlet should be installed near the equipment and be easily accessible. CAUTION RISK OF EXPLOSION IF BATTERY IS REPLACED BY AN INCORRECT TYPE. DISPOSE OF USED BATTERIES ACCORDING TO THE INSTRUCTIONS. 3 - Sony VPL ES2 | User Manual - Page 4
4 - Sony VPL ES2 | User Manual - Page 5
Bottom 11 Control Panel 12 Connector Panel 13 Remote Commander 14 Projecting the Picture Installing the Projector 16 Connecting the Projector 17 INFORMATION Menu 38 Maintenance Replacing the Lamp 40 Cleaning the Air Filter 42 Others Troubleshooting 43 Messages List 46 Specifications - Sony VPL ES2 | User Manual - Page 6
dust on the lens, use a soft dry cloth. Do not use a damp cloth, detergent solution, or thinner. • Clean the filter at regular intervals. On LCD data projector • The LCD data projector is manufactured using high-precision technology. You may, however, see tiny black points and/or bright points (red - Sony VPL ES2 | User Manual - Page 7
projector in the following situations. These installations may cause a malfunction or damage to the projector temperature sensor will function with the message "High temp.! Lamp off in 1 min." The power will be turned filter may cause a rise in the internal temperature of the unit. Clean the filter - Sony VPL ES2 | User Manual - Page 8
on the ventilation holes (intake/ exhaust), see "Location and Function of Controls" on page 11. Tilting the unit out of the range of the from the ceiling. Such installation may cause color shading or shorten the lamp life excessively. Usage in High Altitude When using the projector at an - Sony VPL ES2 | User Manual - Page 9
projector is equipped with a highefficiency optical system made possible by adopting Sony's proprietary optical system that is equipped with a newly developed LCD panel. Because the VPL-CS7 utilizes a 185 W UHP lamp, it can reproduce bright images at 1800 ANSI lumen, while the VPL-ES2 VGA, SVGA and - Sony VPL ES2 | User Manual - Page 10
even if the equipment is disconnected. High portability • Light weight/small size/simple design This projector has been miniaturized to approx. 2.8 kg (6 lb 3 oz) (VPL-ES2)/ approx. 2.9 kg (6 lb 6 oz) (VPL-CS7) in weight and B5-file size. Its simple yet sophisticated design fits comfortably in your - Sony VPL ES2 | User Manual - Page 11
turned on. 3 Ventilation holes (exhaust) 4 Remote control detector 5 Adjuster (hind pad) Turn the clean the air filter every 500 hours. For details, see "Cleaning the Air Filter" on page 42. 8 Ventilation holes (intake) 9 Powered tilt adjuster 0 Indicators POWER SAVING Lights up when the projector - Sony VPL ES2 | User Manual - Page 12
a wall outlet. Once in standby mode, you can turn on the projector with the I / 1 key. - Lights in green when the power is turned on. - Flashes in green while the cooling fan runs for about 90 seconds (VPL-ES2)/ for about 70 seconds (VPL-CS7) after the power is turned off with the I / 1 key. For - Sony VPL ES2 | User Manual - Page 13
Connects the supplied AC power cord. 6 Component input connector (for VPL-ES2 only) According to the connected equipment, component (Y/CB/CR), HDTV or DTV (Y/PB/PR) signal is selected. 5 6 1 INPUT A connector (HD Controls 13 - Sony VPL ES2 | User Manual - Page 14
Resets the value of an item back to its factory preset value or returns the enlarged image back to its original size. This key functions when the menu or a setting item is displayed on the screen. Before using the Remote Commander Pull out the clear film from the lithium battery holder. To replace - Sony VPL ES2 | User Manual - Page 15
the infrared beam between the Remote Commander and the remote control detector on the projector. Direct the Remote Commander toward the remote control detector. • The operation range is limited. The shorter the distance between the Remote Commander and the remote control detector is, the wider the - Sony VPL ES2 | User Manual - Page 16
B Projecting the Picture Installing the Projector This section describes how to install the projector. The distance between the lens and the screen varies depending on the size of the screen. Use the following table as a guide. Distance between the screen and the center of the lens Unit: m (feet) - Sony VPL ES2 | User Manual - Page 17
Projector To connect a computer Ex. VPL-CS7 Left side When you connect the projector, instruction manual. to audio output Computer to monitor output 1HD D-sub 15-pin cable (supplied) 2Stereo audio connecting cable (not supplied) (Use a no-resistance cable) Notes • The projector accepts VGA, SVGA - Sony VPL ES2 | User Manual - Page 18
plug adaptor. To connect to a video GBR/ component output connector Ex. VPL-ES2 Left side Connecting with a VCR This section describes how to connect the projector to a VCR. For more information, refer to the instruction manuals of the equipment you are connecting. To connect to a video or - Sony VPL ES2 | User Manual - Page 19
(VPL-CS7 only) This section describes how to connect the projector to a monitor equipment. For more information, refer to the instruction manuals of not supplied) HD D-sub 15-pin (male) ↔ HD D-sub 15-pin (male) to monitor input Remote control detector 8 Monitor equipment * This projector is not - Sony VPL ES2 | User Manual - Page 20
Component t VIDEO t S VIDEO (VPL-ES2 only) t To input from Press Remote Commander to display the Tilt menu and adjust the tilt using the v/V/b/B keys. To adjust using the Control Panel Press f on F of the TILT key to adjust the tilt of the projector. to lower the to raise the projector projector - Sony VPL ES2 | User Manual - Page 21
1 key again. The powered tilt adjuster is put away in the projector and the lens protector closes. The ON/STANDBY indicator flashes in green and the fan continues to run for about 70 seconds (VPL-CS7)/for about 90 seconds (VPL-ES2) to reduce the internal heat. Also, the ON/ STANDBY indicator flashes - Sony VPL ES2 | User Manual - Page 22
the fan is still running; otherwise, the fan will stop even though the internal heat is still high, which could result in a breakdown of the projector. (VPL-ES2 only) • The internal circuitry of the Off & Go function may cause the fan to continue to operate for a short time even after the I / 1 key - Sony VPL ES2 | User Manual - Page 23
menu appears. : : : : Input A A Remote control detector 5 Press the v or V key to select "Language," then press the B or ENTER key. Convenient Function 1 Plug the AC power cord into a wall outlet. 2 Press the I / 1 key to turn on the projector - Sony VPL ES2 | User Manual - Page 24
to project the picture. Note You will not be able to use the projector if you forget your password and the password administrator is not available. Be X Tilt... V Keystone: Auto... Image Flip: Off Background: Blue Lamp Mode: Standard High Altitude Mode:Off Security Lock: On Input A - Sony VPL ES2 | User Manual - Page 25
you call the customer service center because you have forgotten the password, you will need to be able to verify the projector's serial number and your (VPL-CS7 only) If you are leaving the conference room immediately, turn the projector off, the powered tilt adjuster is put away in the projector, - Sony VPL ES2 | User Manual - Page 26
input. 1 Project a normal image, and press the D ZOOM + key on the Remote Commander. The digital zoom icon appears in the center of the image. Digital zoom icon its original size Press the D ZOOM - key. Just pressing the RESET key returns the image back to its original size immediately. To freeze - Sony VPL ES2 | User Manual - Page 27
B Adjustments and Settings Using the Menu Using the MENU The projector is equipped with an on-screen menu for making various adjustments and settings. Display items Input signal indicator 1 Press the MENU key. The menu appears. - Sony VPL ES2 | User Manual - Page 28
Language" on page 23. To clear the menu Press the MENU key. The menu disappears automatically if a key is not pressed for one minute. To reset items that have been adjusted Press the RESET key on the Remote Commander. "Complete!" appears on the screen and the settings appearing on the screen are - Sony VPL ES2 | User Manual - Page 29
. If the picture has roughness with the "Dynamic" setting, this setting reduces the roughness. The following picture mode can be used for VPL-ES2 only. • Game: Select for viewing game picture. • Living: Select for viewing sports, music, digital video camera picture. • Cinema: Select for viewing film - Sony VPL ES2 | User Manual - Page 30
Setting items Black Level Adj. (VPL-ES2 only) Gamma Mode Color Temp. Functions Initial setting value Using black level adjustment results in a vivid image with clearly defined light and dark areas. Set - Sony VPL ES2 | User Manual - Page 31
squeezed) is input from equipment such as a DVD player. according to a picture mode Adjust Signal... Dot Phase Adjusts the dot phase of the LCD panel and the according to an input signal output from a computer. signal Adjust the picture further for finer picture after the picture is adjusted - Sony VPL ES2 | User Manual - Page 32
Notes • When SVGA or XGA signal is input, "Scan Converter" will not be displayed. • Note that if the projector is used for as 0. When you adjust the data of the signal in the INPUT SETTING menu, it will be registered to the projector. If more than 20 user memories are registered, the newest memory - Sony VPL ES2 | User Manual - Page 33
to "On." • Off: The APA functions when you press the APA key on the Remote Commander. Auto Input Search When set to "On," the projector detects input signals Off in the following order: Input-A/Component (VPLES2 only) /Video/S-Video. It indicates the input channel when the power is turned on or - Sony VPL ES2 | User Manual - Page 34
the lamp goes out. Selects whether the SONY logo on the top panel of On the projector lights when the projector is on. Locks all the control panel keys on the rear and side Off panels of the projector so that the projector can be operated only with the Remote Commander. To lock the control panel - Sony VPL ES2 | User Manual - Page 35
The MENU SETTING Menu The MENU SETTING menu is used for changing the menu displays. MENU SETTING Status: Language: Menu Position: Menu Color: On English Center White Input A A Setting items Status (on-screen display) Language Menu Position Menu Color Functions Initial setting value Sets up - Sony VPL ES2 | User Manual - Page 36
Select "Auto" for automatic correction, or "Manual" for manual correction using the b/v/B/V key on the Remote Commander. When the bottom of the trapezoid is no signal is Blue input to the projector. Select "Black" or "Blue." Normally, set to "Blue." Sets the lamp brightness in the projection. • High - Sony VPL ES2 | User Manual - Page 37
not correct the trapezoidal distortion perfectly, depending on the room temperature or the screen angle. • When the Image Flip is set to "HV" or "V," the Lamp Mode works with "Standard" setting. The INSTALL SETTING Menu 37 - Sony VPL ES2 | User Manual - Page 38
signal. The displayed value is approximate. Displays the vertical frequency of the input signal. The displayed value is approximate. Indicates how long the lamp has been turned on. Initial setting value Note These only display on the screen. You cannot alter the display. 38 The INFORMATION Menu - Sony VPL ES2 | User Manual - Page 39
z - black and white signal) Hue z (except z z - black and white signal) (NTSC 3.58/ 4.43 only) Sharpness z zz - Black Level z Adj. (VPLES2 only) zz - Gamma - Mode - z z (preset memory no.3,4 only) Color Temp. z zz z Volume z zz z z : Adjustable/can be set - : Not - Sony VPL ES2 | User Manual - Page 40
has burnt out or dims • "Please replace the LAMP." appears on the screen • The LAMP/COVER indicator lights up The lamp life varies depending on conditions of use. Use LMP-E180 (VPL-CS7) / LMP-E150 (VPL-ES2) Projector Lamp as the replacement lamp. Use of any other lamps than the LMP-E180 or the LMP - Sony VPL ES2 | User Manual - Page 41
Turn the projector back over. 8 Connect the power cord. The ON/ STANDBY indicator around the I/1 key lights in red. 9 Press the following keys on the remote commander in the following order for less than five seconds each: RESET, b, B, ENTER. Note Do not put your hands into the lamp replacement spot - Sony VPL ES2 | User Manual - Page 42
Place a protective sheet (cloth) beneath the projector and turn the projector over. 5 Wash the air filter with a mild detergent solution and dry it in a shaded place. 6 Attach the air filter and replace the cover. Notes • If you neglect to clean the air filter, dust may accumulate, clogging it. As - Sony VPL ES2 | User Manual - Page 43
B Others Troubleshooting If the projector appears to be operating erratically, try to diagnose and correct the problem using the following instructions. If the problem persists, consult with qualified Sony personnel. Power Symptom Cause and Remedy The power is not turned on. • The power has - Sony VPL ES2 | User Manual - Page 44
the connector and numbers of pixel on the LCD panel. c Change the desktop pattern on Replace the lamp with a new one (see page 40). The picture is not clear. • Picture is out of focus. c Adjust the focus (see page 21). • Condensation has occurred on the lens. c Leave the projector Troubleshooting - Sony VPL ES2 | User Manual - Page 45
does not open due to a problem. c Consult with qualified Sony personnel. If it is necessary to use the projector in case of emergency, use it in the emergency mode (see page 47). The LAMP/COVER indicator lights up. • The lamp has reached the end of its life. c Replace the lamp (see page 40). • The - Sony VPL ES2 | User Manual - Page 46
"Component." c Set "Input-A Signal Sel." correctly (see page 33). Please replace the LAMP. • It is time to replace the lamp. c Replace the lamp. (see page 40) Please clean the filter. • It is time to clean the filter. • Clean the filter. (see page 42) Caution Messages Use the list below to check - Sony VPL ES2 | User Manual - Page 47
mode Before performing the following procedure, try to diagnose the problem using the instructions described in "Troubleshooting" on page 43. If the problem persists, read and following procedure thoroughly and then proceed. The projector is equipped with the emergency mode for the lens protector - Sony VPL ES2 | User Manual - Page 48
LCD panels, 1 lens, projection system LCD panel Superhigh-aperture 0.62-inch SVGA panel, 1,440,000 pixels (480,000 pixels × 3) Lens 1.2 times zoom lens (manual) f 18.0 to 21.6 mm/F 2.2 to 2.4 Lamp VPL-CS7: 185 W UHP VPL-ES2 75 ohms terminated) HD D-sub15-pin ( projector. 48 Specifications - Sony VPL ES2 | User Manual - Page 49
(1) Air filter (for replacement) (1) Operating Instructions (CD-ROM) (1) Quick Reference Manual (1) Security Label (1) Design and specifications are subject to change without notice. Optional accessories Projector Lamp (for replacement) LMP-E180 (for VPL-CS7 only) LMP-E150 (for VPL-ES2 only) Signal - Sony VPL ES2 | User Manual - Page 50
V-neg 840 15 VGA VESA 85 Hz 43.269 85.008 H-neg V-neg 832 16 800 × 600 SVGA VESA 56 Hz 35.156 56.250 H-pos, V-pos 1024 17 SVGA VESA 60 Hz 37.879 60.317 H-pos, V-pos 1056 18 SVGA VESA 72 Hz 48.077 72.188 H-pos, V-pos 1040 19 - Sony VPL ES2 | User Manual - Page 51
Notes • When a signal other than the preset signals shown above is input, the picture may not appear properly. • Memory No. 22* shows the interlace signal. Warning on power connection Use a proper power cord for your local power supply. The United States, Canada Continental Europe UK, Ireland, - Sony VPL ES2 | User Manual - Page 52
28 the picture 29 the picture size/shift 31 Air filter 42 Auto Input Search 33 B Background 36 Black Level Lamp replacement 40 Lamp Timer 38 Language 35 selecting the menu language 23 Lens protector 11 Lithium battery 14 Location and function of controls connector panel 13 control - Sony VPL ES2 | User Manual - Page 53
and function of controls .........14 Remote control detector 11 Reset resettable items 28 resetting the item 28 S Scan Converter 31 Screen size 16, 48 Security Lock 36 Sharpness 29 Shift 31 Smart APA 33 Specifications 48 Status 35 Supplied accessories 49 T Tilt 36 Troubleshooting 43 - Sony VPL ES2 | User Manual - Page 54
Sony Corporation
-
 1
1 -
 2
2 -
 3
3 -
 4
4 -
 5
5 -
 6
6 -
 7
7 -
8
-
9
-
10
-
11
-
12
-
13
-
14
-
15
-
16
-
17
-
18
-
19
-
20
-
21
-
22
-
23
-
24
-
25
-
26
-
27
-
28
-
29
-
30
-
31
-
32
-
33
-
34
-
35
-
36
-
37
-
38
-
39
-
40
-
41
-
42
-
43
-
44
-
45
-
46
-
47
-
48
-
49
-
50
-
51
-
52
-
53
-
54
 |
 |
© 2004 Sony Corporation
2-148-435-
11
(1)
Data Projector
Operating Instructions
VPL-CS7
VPL-ES2