Stihl HT 101 Instruction Manual - Page 32
Taking Care of the Guide Bar, Cleaning the Air Filter - replacement parts
 |
View all Stihl HT 101 manuals
Add to My Manuals
Save this manual to your list of manuals |
Page 32 highlights
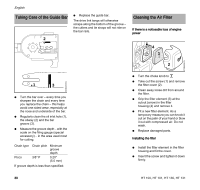
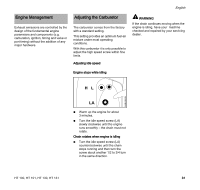
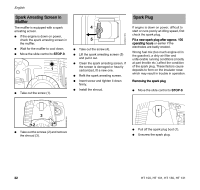
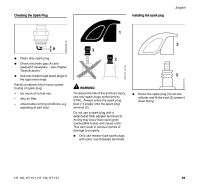
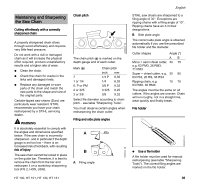
390BA050 KN 273BA006 KN English Taking Care of the Guide Bar N Replace the guide bar. The drive link tangs will otherwise scrape along the bottom of the groove - the cutters and tie straps will not ride on the bar rails. 2 Cleaning the Air Filter If there is a noticeable loss of engine power 4 1 2 1 3 N Turn the bar over - every time you sharpen the chain and every time you replace the chain - this helps avoid one-sided wear, especially at the nose and underside of the bar. N Regularly clean the oil inlet hole (1), the oilway (2) and the bar groove (3). N Measure the groove depth - with the scale on the filing gauge (special accessory) - in the area used most for cutting. Chain type Picco Chain pitch 3/8" P Minimum groove depth 0.20" (5.0 mm) If groove depth is less than specified: N Turn the choke knob to g N Take out the screw (1) and remove the filter cover (2). N Clean away loose dirt from around the filter. N Grip the filter element (3) at the cutout (arrow) in the filter housing (4) and remove it. N Fit a new filter element. As a temporary measure you can knock it out on the palm of your hand or blow it out with compressed air. Do not wash. N Replace damaged parts. Installing the filter N Install the filter element in the filter housing and fit the cover. N Insert the screw and tighten it down firmly. 30 HT 100, HT 101, HT 130, HT 131
-
 1
1 -
2
-
3
-
4
-
5
-
6
-
7
-
8
-
9
-
10
-
11
-
12
-
13
-
14
-
15
-
16
-
17
-
18
-
19
-
20
-
21
-
22
-
23
-
24
-
25
-
26
-
 27
27 -
 28
28 -
 29
29 -
 30
30 -
 31
31 -
 32
32 -
 33
33 -
 34
34 -
 35
35 -
 36
36 -
 37
37 -
38
-
39
-
40
-
41
-
42
-
43
-
44
-
45
-
46
-
47
-
48
-
49
-
50
-
51
-
52
-
53
-
54
-
55
-
56
-
57
-
58
-
59
-
60
-
61
-
62
-
63
-
64
-
65
-
66
-
67
-
68
-
69
-
70
-
71
-
72
-
73
-
74
-
75
-
76
-
77
-
78
-
79
-
80
-
81
-
82
-
83
-
84
-
85
-
86
-
87
-
88
-
89
-
90
-
91
-
92
-
93
-
94
-
95
-
96
-
97
-
98
-
99
-
100
-
101
-
102
-
103
-
104
 |
 |
