Stihl RZ 142 Instruction Manual - Page 35
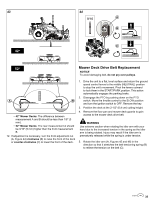
Mower Deck Drive Belt Replacement
 |
View all Stihl RZ 142 manuals
Add to My Manuals
Save this manual to your list of manuals |
Page 35 highlights
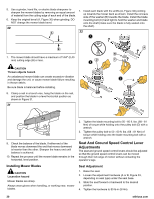
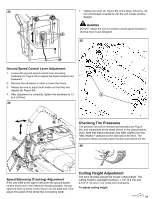
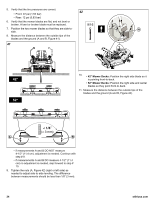
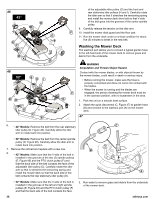
43 44 Mower Deck Drive Belt Replacement NOTICE To avoid damaging belt, do not pry over pulleys. • 42" Mower Decks: The difference between measurement A and B should be less than 1/8" (3 mm). • 52" Mower Decks: The rear measurement A should be 3/16" (5 mm) higher than the front measurement B. 12. If adjustment is necessary, turn the front adjustment nut (A, Figure 44) clockwise (B) to raise the front of the deck or counter-clockwise (C) to lower the front of the deck. 1. Drive the unit to a flat, level surface and return the ground speed control levers to the middle (NEUTRAL) position to stop the unit's movement. Pivot the levers outward to lock them in the START/PARK position. This action automatically engages the parking brake. 2. Disengage the PTO by pushing down on the PTO switch. Move the throttle control to the SLOW position and turn the ignition switch to OFF. Remove the key. 3. Position the deck at the 2-1/2" (6,4 cm) cutting height. 4. Remove the floor pan and mower deck guards to gain access to the mower deck drive belt. WARNING Use extreme caution when rotating the idler arm with your hand due to the increased tension in the spring as the idler arm is being rotated. Injury may result if the idler arm is prematurely released while the spring is under tension. 5. Rotate the idler arm (A, Figures 45 and 46) in the direction so that it stretches the belt tensioning spring (B) to relieve the tension on the belt (C). 35
-
 1
1 -
2
-
3
-
4
-
5
-
6
-
7
-
8
-
9
-
10
-
11
-
12
-
13
-
14
-
15
-
16
-
17
-
18
-
19
-
20
-
21
-
22
-
23
-
24
-
25
-
26
-
27
-
28
-
29
-
 30
30 -
 31
31 -
 32
32 -
 33
33 -
 34
34 -
 35
35 -
 36
36 -
 37
37 -
 38
38 -
 39
39 -
 40
40 -
41
-
42
-
43
-
44
 |
 |
