Symphonic SC3809 Owner's Manual - Page 8
Operating, Controls, Functions
 |
View all Symphonic SC3809 manuals
Add to My Manuals
Save this manual to your list of manuals |
Page 8 highlights
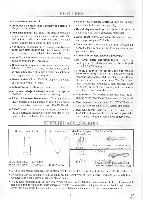
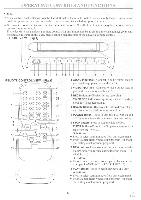
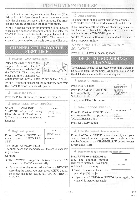
OPERATING CONTROLS AND FUNCTIONS NOTE: • Some controls are located on both the TVNCR and on the remote control, some are only located on one, some controls operate certain functions only in one location. See each description for details. • We do not recommend the use of universal remote controls. Not all of the functions may be controlled with a universal remote control. If you decide to use a universal remote control with this unit, please be aware that the code number given may not operate this unit. In this case, please call the manufacturer of the universal remote control. - FRONT VIEW - [Fig.1] C09T•O. 1,M.,..00 PLAY F 0+0. •tr.r. • • (=It= ft f CD ww 12 34 REMOTE CONTROL VIEW - [F g.2] L_E WEDI SLEEP EJECT 5 'cp CD ci 15 CD CD CDI CD-I CHANNEL CD CD CD 0- CD ( 0) DISPLAY VOLtR I 16 cD CD- 17 7 4 A PLAY F FWD 6 t, STOP RECORD v sPEEo PAus6s-nu. 10 CD 18 CD couTZ"" 19 5 6 7 8 9 10 11 12 13 14 1 AUDIO input jack- Connect to audio output jack of your audio equipment or another VCR. 25 2 VIDEO input jack- Connect to video output jack of your video camera or another VCR. 6 3 REC indicator- Flashes during recording. 24 TIMER REC indicator-Lights up in the Stand-by mode for Timer Recording. 12- 4 Remote Sensor- Receives the infrared control sig- nals from the handheld remote control unit. 11 5 POWER button- Press to turn the TVNCR on and ,11. Press to activate the automatic timer recording. 23 8 6 STOP button -Press to stop the tape motion. EJECT button- Press in the Stop mode to remove a 9 tape from the TVNCR. V button- 22 • Press to select setting modes from on screen menu. 21 • Press to enter digits when setting program (for exam- ple: setting clock or timer program). 20 7 REW button- Press to rewind the tape, or to view the picture rapidly in reverse during the Play mode. (Re- wind Search) AI button- • Press to select a mode from a particular menu (for example: LANGUAGE or USER'S SET UP) 8 PLAY button- Press to begin playback of a tape. A button- • Press to select setting modes from on screen menu. • Press to enter digits when setting program (for exam- ple: setting clock or timer program). - 8 - EN 8B26
-
 1
1 -
2
-
 3
3 -
 4
4 -
 5
5 -
 6
6 -
 7
7 -
 8
8 -
 9
9 -
 10
10 -
 11
11 -
 12
12 -
 13
13 -
14
-
15
-
16
-
17
-
18
-
19
-
20
-
21
-
22
-
23
-
24
-
25
-
26
-
27
-
28
-
29
-
30
 |
 |
