Synology DS418 Transactions in Surveillance Station 8.1.0 and above - Page 10
Paired Camera, Add Transaction Device Wizard, Live View, On-Screen Display, Set up the display style
 |
View all Synology DS418 manuals
Add to My Manuals
Save this manual to your list of manuals |
Page 10 highlights
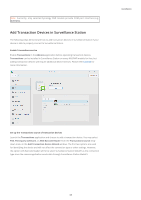
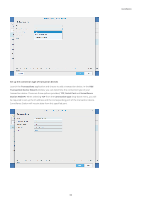
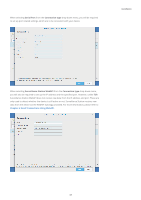
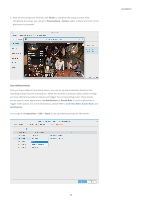
2. If you want to parse a string in the format of "Cash $dddd", you can use the following regular expressions: • Cash.*\$\d+ Note: In this regular expression, "." represents any characters other than "\n", and "*" means the previous character repeats 0 or more times. Therefore, the combination ".*" can parse any string formats. "\$" represents the character "$". Since the character "$" has a special meaning in regular expression, we need to add an additional "\" before "$" to take away its special meaning. The character "+" means the previous character repeats 1 or more times. 6. Regular expressions provide highly flexible formats to represent strings. In this article, we have only given you some less complicated examples. Please refer to other online resources for more information on regular expressions. 7. After you finish setting up the parsing rule settings, the Filtered data area will show the transactions list by list, and the text in the Raw data area will have a different appearance. Different styles in the area represent different meanings as follows: 1. Bold: The strings are currently shown in the Filtered data area. 2. Blue: The matched strings parsed by the Start of transaction, End of transaction and Canceling of transaction rules. 3. Black: The normal strings that does not match any rules. 4. Gray: Represent the control characters defined in ASCII or the strings be filtered by rules. For more information on the control characters defined in ASCII, please refer to this website. 8. You can click Next to pair cameras and set up the display options after you finished setting up parsing rules. Set up the display style The following steps will show you how to pair a camera for the transaction device, and modulate the display style of the text to be displayed on screen. 1. Under the Paired Camera section in the Add Transaction Device Wizard window, you can decide whether or not to pair a camera to a transaction device. If you choose to pair a camera to a transaction device, the pairing camera can be selected from the cameras that are added in Surveillance Station, and you can determine which stream profile to record when transactions occur. You can watch live view streams of the paired camera while overlaying transaction data in the Live View application. Video images of the paired camera during transactions will be automatically recorded and stored. If you enable the CMS service in Surveillance Station, the paired camera must be on the local server. If you choose not to pair a camera, the data receiving function will not be affected. 2. Under the On-Screen Display section in the Add Transaction Device Wizard window, you can modulate the display style of the text to display on screen. Any changes you modify will immediately be displayed on the right-hand side of the screen, which is the snapshot taken from the paired camera. You can effortlessly adjust and select a desired display style. 09 Installation
-
 1
1 -
2
-
3
-
4
-
 5
5 -
 6
6 -
 7
7 -
 8
8 -
 9
9 -
 10
10 -
 11
11 -
 12
12 -
 13
13 -
 14
14 -
 15
15 -
16
-
17
-
18
-
19
-
20
-
21
-
22
-
23
-
24
-
25
-
26
-
27
-
28
-
29
-
30
-
31
-
32
-
33
-
34
-
35
 |
 |
