TASCAM DR-07X Owners Manual - Page 9
Using the menu, Recording
 |
View all TASCAM DR-07X manuals
Add to My Manuals
Save this manual to your list of manuals |
Page 9 highlights
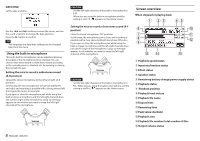
When recording or in recording standby 1Level mode setting status 2Plug-in power status 3Low cut filter status 4Tone output setting status 5Built-in stereo microphone left-right setting 6Recording status 7Recording level meters 8Recording file name 9Recording format 0Elapsed recording time qRemaining recording time wPeak value (decibels) eRecording level status Using the menu Use the menu to change various settings, including recording, playback and system settings, and to execute various functions. 1. Press the MENU button. The MENU screen will open. Recording 1. Point the built-in mic towards the sound to be recorded. Sound source Built-in mic 2. Use the + and − buttons to select the menu item, and press 7. The setting screen will open. 3. Use the + and − buttons to select the setting item, and press 7. Settings can now be changed and functions executed. 2. Press the RECORD [0] button to enter recording standby. Recording standby will start, 09 will appear on the display, and the REC indicator will blink. -12dB 4. Use the + and − buttons to change the setting. NOTE ii Press the MENU button to return to the previous screen. ii To return to the Home screen, press the ¤ (HOME) [8] button. 3. Adjust the recording level. Adjust the built-in mic orientation and distance from the sound source as well as the input level so that the recording level meters stay near −12 dB at the peak input level. Use the . and / buttons to adjust the input level. TASCAM DR-07X 9
-
 1
1 -
2
-
3
-
 4
4 -
 5
5 -
 6
6 -
 7
7 -
 8
8 -
 9
9 -
 10
10 -
 11
11 -
 12
12 -
 13
13 -
 14
14 -
15
-
16
-
17
-
18
-
19
-
20
-
21
-
22
-
23
-
24
-
25
-
26
-
27
-
28
-
29
-
30
-
31
-
32
-
33
-
34
-
35
-
36
-
37
-
38
-
39
-
40
-
41
-
42
-
43
-
44
-
45
-
46
-
47
-
48
-
49
-
50
-
51
-
52
-
53
-
54
-
55
-
56
-
57
-
58
-
59
-
60
-
61
-
62
-
63
-
64
-
65
-
66
-
67
-
68
-
69
-
70
-
71
-
72
-
73
-
74
-
75
-
76
-
77
-
78
-
79
-
80
-
81
-
82
-
83
-
84
-
85
-
86
-
87
-
88
-
89
-
90
-
91
-
92
 |
 |
