TEAC AI-503 AI-503 Owner s Manual - Page 13
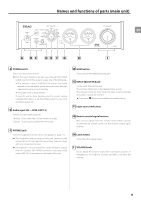
Names and functions of parts (main unit)
 |
View all TEAC AI-503 manuals
Add to My Manuals
Save this manual to your list of manuals |
Page 13 highlights
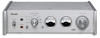
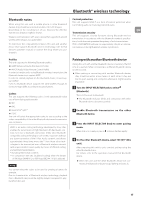
Names and functions of parts (main unit) EN A B C DE F G H I A POWER switch Use to turn the unit on and off. oo If all the input indicators are dark even though the POWER switch is set to ON, the cause is usually one of the following. ii The remote control STANDBY/ON button has been pressed or the automatic power saving function has activated, putting the unit into standby. ii The power cord is disconnected. To turn the unit on from standby, press the remote control STANDBY/ON button, or set the POWER switch to OFF once and then back to ON. B Audio input (IN - LINE 2/OPT 2) Use this to input audio (page 10). Analog: Use a cable with a 3.5mm stereo mini plug. Optical: Use an optical cable with a mini plug. C PHONES jack Connect headphones (3.5mm stereo mini plug) here (page 11). oo This headphone amp circuit uses a four-pole connector with independent left and right for grounding. Ordinary plugs with 3 or 4 poles can be used. oo If headphones are connected here, audio will not be output from the speaker (SPEAKERS) terminals or preamp audio output (PRE OUT) connectors on the back of the unit. D GAIN button Use to switch the headphone amp gain. E INPUT SELECTOR knob Use to select the input source. The indicator lights next to the selected input source. The indicators blink to show when the filter is being changed and audio is muted, for example. oo Press when (Bluetooth) is selected to enable pairing. F Input source indicators G Remote control signal receiver This receives signals from the remote control. When operating the remote control, point it at the remote control signal receiver. H Level meters These show the output levels. I VOLUME knob Use to adjust the volume output from connected speakers or headphones. Turn right to increase and left to decrease the volume. 13
-
 1
1 -
2
-
3
-
4
-
5
-
6
-
7
-
 8
8 -
 9
9 -
 10
10 -
 11
11 -
 12
12 -
 13
13 -
 14
14 -
 15
15 -
 16
16 -
 17
17 -
 18
18 -
19
-
20
-
21
-
22
-
23
-
24
-
25
-
26
-
27
-
28
-
29
-
30
-
31
-
32
-
33
-
34
-
35
-
36
-
37
-
38
-
39
-
40
-
41
-
42
-
43
-
44
-
45
-
46
-
47
-
48
-
49
-
50
-
51
-
52
-
53
-
54
-
55
-
56
-
57
-
58
-
59
-
60
-
61
-
62
-
63
-
64
-
65
-
66
-
67
-
68
-
69
-
70
-
71
-
72
 |
 |
