TEAC CD-RW901SL CD-RW901SL Owner's Manual - Page 13
RC-RW901SL Remote control unit
 |
View all TEAC CD-RW901SL manuals
Add to My Manuals
Save this manual to your list of manuals |
Page 13 highlights
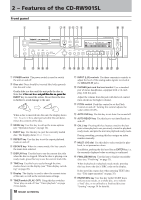
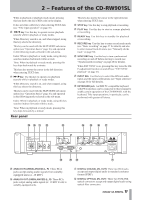
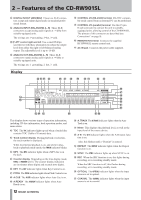
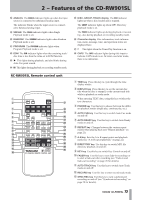
IM2PO−RFTeAaNtuTrSeAs FoEfTtYhIeNCSDTR-RUWCT9IO01NSSL I ANALOG The ANALOG indicator lights up when the input source is connected to unbalanced analog input. The indicator blinks when the input source is connected to balanced analog input. O SINGLE The SINGLE indicator lights when Single Playback mode is set. P RANDOM This RANDOM indicator lights when Random Playback mode is set. A PROGRAM The PROGRAM indicator lights when Program Playback mode is set. S EOM The EOM indicator lights when the remaining track/ disc time is less than the value set in EOM function. D ¥ This lights during playback, and also blinks during Auto Cue point search. F π This lights during playback or recording standby mode. RC-RW901SL Remote control unit 1 2 u 3 i 4 o 5 p 6 a s 7 8 d 9 f 0 g q h w j e k r l t ; y G DISC, GROUP, TRACK display The DISC indicator lights up when a disc loaded and is stopped. The GROUP indicator lights up when MP3 Directory playback mode is on. The TRACK indicator lights up during playback or recording , also during playback or recording standby mode. H Character display Disc information, track information, menu, message, time, and operation status are displayed here. J This lights when the Timer Play function is on. K CAPS The CAPS indicator lights during title input to indicate CAPS mode is on. In lower case letter mode, there is no indication. 1 TIME key Press this key to cycle through the time display modes. 2 DISPLAY key Press this key to see the current disc title when the disc is stopped, or the current track title while in playback or ready mode. When entering TEXT data, using this key switches the text characters. 3 P.MODE key Use this key to choose between the differ- ent playback modes (single play, continue play, etc.). 4 AUTO CUE key Use this key to switch Auto Cue mode on and off 5 AUTO READY key Use this key to switch Auto Ready mode on and off. 6 REPEAT key Changes between the various repeat modes when playing back (see "Repeat playback" on page 21). 7 A-B key Sets the A to B repeat points and playback mode (see "A to B repeat playback" on page 22). 8 DIRECTORY key Use this key to switch MP3 file directory playback on and off. 9 KEY key Use this key to switch Key Control on and off. 0 FADER key Use this key to start fade-in recordings or to start a fade-out when recording (see "Fade-in and fade-out recording" on page 28 for details). q AUTO TRACK key Use this key to switch Auto Track mode on and off. w RECORD key Use this key to enter record ready mode. e SYNC REC key Use this key to turn synchronized recording on and off (see "Synchronized recording" on page 28 for details). 13 TASCAM CD-RW901SL
-
 1
1 -
2
-
3
-
4
-
5
-
6
-
7
-
 8
8 -
 9
9 -
 10
10 -
 11
11 -
 12
12 -
 13
13 -
 14
14 -
 15
15 -
 16
16 -
 17
17 -
 18
18 -
19
-
20
-
21
-
22
-
23
-
24
-
25
-
26
-
27
-
28
-
29
-
30
-
31
-
32
-
33
-
34
-
35
-
36
-
37
-
38
-
39
-
40
-
41
-
42
 |
 |
