TP-Link Archer D2 Archer D2 V1 User Guide - Page 75
User Accounts
 |
View all TP-Link Archer D2 manuals
Add to My Manuals
Save this manual to your list of manuals |
Page 75 highlights
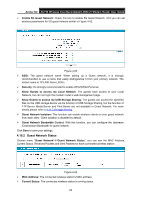
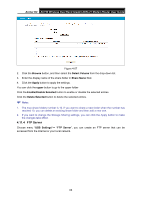
Archer D2 AC750 Wireless Dual Band Gigabit ADSL2+ Modem Router User Guide Status: Indicates the shared or non-shared status of the volume. Active means volume can be shared, while Inactive means volume can not be shared. If Inactive in Action field is enabled, Active will be displayed in the Status field, which means volume can not be shared. Action: When the volume is shared, you can click the Deactivate to stop sharing the volume; when volume is non-shared, you can click the Activate button to share the volume. Click Disconnect to safely remove the USB storage device that is connected to USB port. Note: Before removing the USB storage device, you should click "Disconnect" to make sure that all your data have been saved completely. Removing device directly may cause your USB storage device crashed. 4.11.2 User Accounts You can specify the user name and password for Storage Sharing and FTP Server users on this page. Storage Sharing users can access the folders by entering the following URL into the address field of your browser or Windows Explorer, such as. \\192.168.1.1. FTP Server users can log into the FTP Server via FTP Client. You can set up five users and control their access to the USB mass storage by Storage Sharing or FTP on this page. The Super User has the right to read and write to Storage Sharing and FTP Server. Figure 4-55 To add a new user account, please follow the steps below: 1. Choose the index from the drop-down list of Choose Index. 2. Self-define a New Username. 3. Enter the password in the New Password field. 4. Re-enter the password in the Confirm password field. 5. Click the Set button, and then a new entry will be added in the table. To delete an existing user account, please click Delete in the Action column. 64
-
 1
1 -
2
-
3
-
4
-
5
-
6
-
7
-
8
-
9
-
10
-
11
-
12
-
13
-
14
-
15
-
16
-
17
-
18
-
19
-
20
-
21
-
22
-
23
-
24
-
25
-
26
-
27
-
28
-
29
-
30
-
31
-
32
-
33
-
34
-
35
-
36
-
37
-
38
-
39
-
40
-
41
-
42
-
43
-
44
-
45
-
46
-
47
-
48
-
49
-
50
-
51
-
52
-
53
-
54
-
55
-
56
-
57
-
58
-
59
-
60
-
61
-
62
-
63
-
64
-
65
-
66
-
67
-
68
-
69
-
 70
70 -
 71
71 -
 72
72 -
 73
73 -
 74
74 -
 75
75 -
 76
76 -
 77
77 -
 78
78 -
 79
79 -
 80
80 -
81
-
82
-
83
-
84
-
85
-
86
-
87
-
88
-
89
-
90
-
91
-
92
-
93
-
94
-
95
-
96
-
97
-
98
-
99
-
100
-
101
-
102
-
103
-
104
-
105
-
106
-
107
-
108
-
109
-
110
-
111
-
112
-
113
-
114
-
115
-
116
-
117
-
118
-
119
-
120
 |
 |
