TP-Link TL-SC3171G User Guide - Page 51
Configuring your IP camera, BASIC->Network->Messenger, Advanced->System Log->Setting
 |
UPC - 845973054038
View all TP-Link TL-SC3171G manuals
Add to My Manuals
Save this manual to your list of manuals |
Page 51 highlights
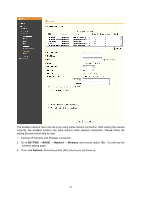
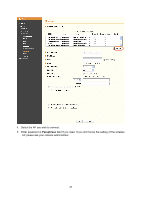
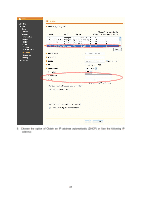
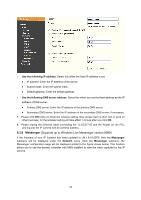
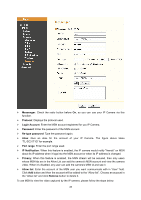
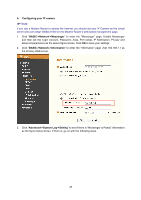
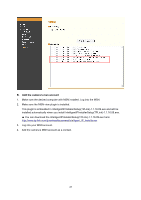
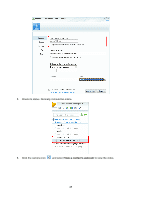
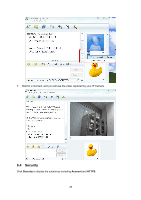
A. Configuring your IP camera ) Note: If you use a Modem Router to access the Internet, you should set your IP Camera as the virtual server with port range 20000-21000 on the Modem Router's web-based management page. 1. Click "BASIC->Network->Messenger" to enter the "Messenger" page. Enable Messenger and then set the Login Account, Password, Alias, Port range, IP Notification, Privacy and Allow list parameters as the above figure shows. Click OK to save your settings. 2. Click "BASIC->Network->Information" to enter the "Information" page. Add 192.168.1.1 as the Primary DNS server. 3. Click "Advanced->System Log->Setting" to see if there is "Messenger is Ready" information as the figure below shows. If there is, go on with the following steps. 46
-
 1
1 -
2
-
3
-
4
-
5
-
6
-
7
-
8
-
9
-
10
-
11
-
12
-
13
-
14
-
15
-
16
-
17
-
18
-
19
-
20
-
21
-
22
-
23
-
24
-
25
-
26
-
27
-
28
-
29
-
30
-
31
-
32
-
33
-
34
-
35
-
36
-
37
-
38
-
39
-
40
-
41
-
42
-
43
-
44
-
45
-
 46
46 -
 47
47 -
 48
48 -
 49
49 -
 50
50 -
 51
51 -
 52
52 -
 53
53 -
 54
54 -
 55
55 -
 56
56 -
57
-
58
-
59
-
60
-
61
-
62
-
63
-
64
-
65
-
66
-
67
-
68
-
69
-
70
-
71
-
72
-
73
-
74
-
75
-
76
-
77
-
78
-
79
-
80
-
81
-
82
-
83
-
84
-
85
-
86
-
87
-
88
-
89
 |
 |
