TP-Link TL-WN8200ND TL-WN8200ND V1 User Guide - Page 24
TL-WN8200ND, Add device, Connect, Connect successfully,
 |
View all TP-Link TL-WN8200ND manuals
Add to My Manuals
Save this manual to your list of manuals |
Page 24 highlights
TL-WN8200ND 300Mbps High Power Wireless USB Adapter Figure 3-15 2. Open your router's Web-based Utility and click WPS link on the left of the main menu. Then click Add device and the following figure will appear. Enter the PIN value of the adapter in the empty field beside PIN and then click Connect. Figure 3-16 3. When Connect successfully appears on the screen, the WPS configuration is complete. Or you can view the adapter's utility page to see whether the connection has been successful as shown in Figure 3-18. 17
-
 1
1 -
2
-
3
-
4
-
5
-
6
-
7
-
8
-
9
-
10
-
11
-
12
-
13
-
14
-
15
-
16
-
17
-
18
-
 19
19 -
 20
20 -
 21
21 -
 22
22 -
 23
23 -
 24
24 -
 25
25 -
 26
26 -
 27
27 -
 28
28 -
 29
29 -
30
-
31
-
32
-
33
-
34
-
35
-
36
-
37
-
38
-
39
-
40
-
41
-
42
-
43
-
44
 |
 |

TL-WN8200ND
300Mbps High Power Wireless USB Adapter
17
Figure 3-15
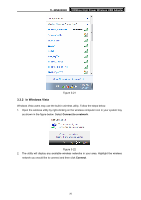
2.
Open your router’s Web-based Utility and click WPS link on the left of the main menu. Then
click
Add device
and the following figure will appear. Enter the PIN value of the adapter in
the empty field beside PIN and then click
Connect
.
Figure 3-16
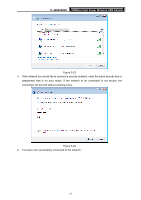
3.
When
Connect successfully
appears on the screen, the WPS configuration is complete.
Or you can view the adapter’s utility page to see whether the connection has been
successful as shown in Figure 3-18.