TP-Link TL-WR1042ND User Guide - Page 14
The Rear Panel, TL-WR1042ND, POWER, RESET, Factory Defaults, System Tools, INTERNET - printer setup
 |
View all TP-Link TL-WR1042ND manuals
Add to My Manuals
Save this manual to your list of manuals |
Page 14 highlights
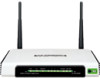
TL-WR1042ND 300Mbps Wireless N Gigabit Router ) Note: 1. After a device is successfully added to the network by WPS function, the WPS LED will keep on for about 5 minutes and then turn off. 2. Pressing the Wireless On/Off button for two seconds will turn on/off the wireless radio. When the WIRELESS LED flashes, the wireless function has been enabled. When the WIRELESS LED is off, the wireless function has been disabled. 1.4.2 The Rear Panel Figure 1-2 Rear Panel sketch The following parts are located on the rear panel (View from left to right). ¾ POWER: The Power socket is where you will connect the power adapter. Please use the power adapter provided with this TL-WR1042ND 300Mbps Wireless N Gigabit Router. ¾ WPS: If you have client devices, such as wireless adapters, that support Wi-Fi Protected Setup, then you can press this button to quickly establish a connection between the Router and client devices and automatically configure wireless security for your wireless network. ¾ RESET: There are two ways to reset to the Router's factory defaults: 1) Use the Factory Defaults function on System Tools -> Factory Defaults page in the Router's Web-based Utility. 2) Use the Factory Default Reset button: Press the Reset button for five seconds and then wait for the Router to reboot. ¾ USB: The USB port connects to a USB storage device or a USB printer. ¾ INTERNET: This port is where you will connect the DSL/cable Modem, or Ethernet. -5-
-
 1
1 -
2
-
3
-
4
-
5
-
6
-
7
-
8
-
 9
9 -
 10
10 -
 11
11 -
 12
12 -
 13
13 -
 14
14 -
 15
15 -
 16
16 -
 17
17 -
 18
18 -
 19
19 -
20
-
21
-
22
-
23
-
24
-
25
-
26
-
27
-
28
-
29
-
30
-
31
-
32
-
33
-
34
-
35
-
36
-
37
-
38
-
39
-
40
-
41
-
42
-
43
-
44
-
45
-
46
-
47
-
48
-
49
-
50
-
51
-
52
-
53
-
54
-
55
-
56
-
57
-
58
-
59
-
60
-
61
-
62
-
63
-
64
-
65
-
66
-
67
-
68
-
69
-
70
-
71
-
72
-
73
-
74
-
75
-
76
-
77
-
78
-
79
-
80
-
81
-
82
-
83
-
84
-
85
-
86
-
87
-
88
-
89
-
90
-
91
-
92
-
93
-
94
-
95
-
96
-
97
-
98
-
99
-
100
-
101
-
102
-
103
-
104
-
105
-
106
-
107
-
108
-
109
-
110
-
111
-
112
-
113
-
114
-
115
-
116
-
117
-
118
-
119
-
120
 |
 |
