TRENDnet TV-IP310PI User's Guide - Page 13
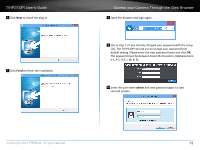
Mount your camera, Loosen the lock ring and then adjust the camera posi°on. Tighten
 |
View all TRENDnet TV-IP310PI manuals
Add to My Manuals
Save this manual to your list of manuals |
Page 13 highlights
TV-IP310PI User's Guide Mount your camera Drill the screw holes and the cable hole if necessary with the drill template comes with the package. Hole Hole TV-IP310PI Ceiling Mount Template Hole Fix the mounting base on the ceiling or the wall with the screws that come with the package. Route the cables to the cable hole. Installation Loosen the lock ring and then adjust the camera position. Tighten the lock ring when you setup the camera position. © Copyright 2014 TRENDnet. All rights reserved. 10
-
 1
1 -
2
-
3
-
4
-
5
-
6
-
7
-
 8
8 -
 9
9 -
 10
10 -
 11
11 -
 12
12 -
 13
13 -
 14
14 -
 15
15 -
 16
16 -
 17
17 -
 18
18 -
19
-
20
-
21
-
22
-
23
-
24
-
25
-
26
-
27
-
28
-
29
-
30
-
31
-
32
-
33
-
34
-
35
-
36
-
37
-
38
-
39
-
40
-
41
-
42
-
43
-
44
-
45
-
46
-
47
-
48
-
49
-
50
-
51
-
52
-
53
-
54
-
55
-
56
-
57
-
58
-
59
 |
 |

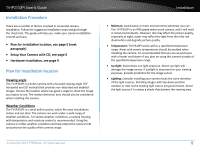
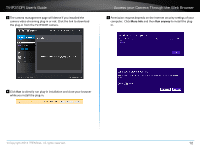
TV-IP310PI User’s Guide
Installation
© Copyright 2014 TRENDnet. All rights reserved.
10
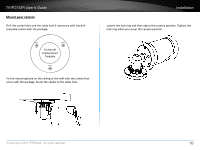
Drill the screw holes and the cable hole if necessary with the drill
template comes with the package.
TV-IP310PI
Ceiling Mount
Template
Hole
Hole
Hole
Fix the moun°ng base on the ceiling or the wall with the screws that
come with the package. Route the cables to the cable hole.
Loosen the lock ring and then adjust the camera posi°on. Tighten the
lock ring when you setup the camera posi°on.
Mount your camera