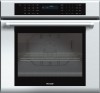
Thermador ME301JP User Manual - Page 26
Maintenance
 |
View all Thermador ME301JP manuals
Add to My Manuals
Save this manual to your list of manuals |
Page 26 highlights
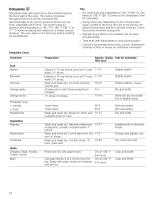
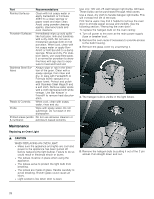
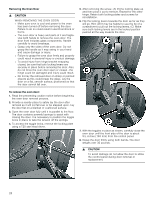
Part Painted Surfaces Porcelain Surfaces Stainless Steel Surfaces Plastic & Controls Probe Printed areas (words & numbers) Recommendations Clean with hot soapy water or apply Fantastik® or Formula 409® to a clean sponge or paper towel and wipe clean. Avoid using powder cleaning agents, steel wool pads and oven cleaners. Immediately wipe up acid spills like fruit juice, milk and tomatoes with a dry cloth. Do not use a moistened sponge/cloth on hot porcelain. When cool, clean with hot soapy water or apply BonAmi® or Soft Scrub® to a damp sponge. Rinse and dry. For stubborn stains, use soap-filled pads. It is normal for porcelain to show fine lines with age due to exposure to heat and food soil. Always wipe or rub in the direction of the grain. Clean with a soapy sponge, then rinse and dry, or wipe with Fantastik® or Formula 409® sprayed on a paper towel. Protect and polish with Stainless Steel Magic® and a soft cloth. Remove water spots with a cloth dampened with white vinegar. Use Bar Keeper´s Friend® to remove heat discoloration. When cool, clean with soapy water, rinse and dry. Wipe with soapy water. Do not submerge. Do not wash in the dishwasher. Do not use abrasive cleaners or petroleum based solvents. Maintenance Replacing an Oven Light 9 CAUTION WHEN REPLACING AN OVEN LIGHT: ▯ Make sure the appliance and lights are cool and power to the appliance has been turned off before replacing the light bulb(s). Failure to do so could result in electrical shock or burns. ▯ The lenses must be in place when using the appliance. ▯ The lenses serve to protect the light bulb from breaking. ▯ The lenses are made of glass. Handle carefully to avoid breaking. Broken glass could cause an injury. ▯ Light socket is live when door is open. Use only 120 volt, 25 watt halogen light bulbs, G9 base. These bulbs can be purchased through retail stores. Use a clean, dry cloth to handle halogen light bulbs. This will increase the life of the bulb. Hint: Some users may find it helpful to remove the oven door to provide easier access and visibility. See the following section: "Removing the oven door". To replace the halogen bulb on the oven ceiling: 1. Turn off power to the oven at the main power supply (fuse or breaker box). 2. Remove the oven racks if necessary to provide access to the bulb housing. 3. Remove the glass cover by unscrewing it. 4. The halogen bulb is visible in the light fixture. 5. Remove the halogen bulb by pulling it out of the 2 pin socket. Pull straight down and out. 26
-
 1
1 -
2
-
3
-
4
-
5
-
6
-
7
-
8
-
9
-
10
-
11
-
12
-
13
-
14
-
15
-
16
-
17
-
18
-
19
-
20
-
 21
21 -
 22
22 -
 23
23 -
 24
24 -
 25
25 -
 26
26 -
 27
27 -
 28
28 -
 29
29 -
 30
30 -
 31
31 -
32
-
33
-
34
-
35
-
36
-
37
-
38
-
39
-
40
-
41
-
42
-
43
-
44
-
45
-
46
-
47
-
48
-
49
-
50
-
51
-
52
-
53
-
54
-
55
-
56
-
57
-
58
-
59
-
60
-
61
-
62
-
63
-
64
-
65
-
66
-
67
-
68
-
69
-
70
-
71
-
72
-
73
-
74
-
75
-
76
-
77
-
78
-
79
-
80
-
81
-
82
-
83
-
84
-
85
-
86
-
87
-
88
-
89
-
90
-
91
-
92
-
93
-
94
-
95
-
96
-
97
-
98
-
99
-
100
-
101
-
102
-
103
-
104
-
105
-
106
-
107
-
108
-
109
-
110
-
111
-
112
 |
 |
