Thermador ME301JP User Manual - Page 27
the bulb out using both hands.
 |
View all Thermador ME301JP manuals
Add to My Manuals
Save this manual to your list of manuals |
Page 27 highlights
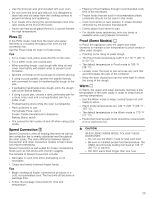
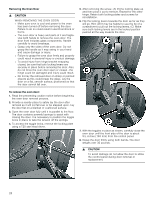
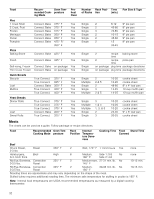
6. Replace with a new halogen bulb. Grasp the new bulb with a clean, dry cloth. Press the 2 pins on the bulb into the socket holes until the bulb is firmly seated. 5. (A) Push the screwdriver blade inward to disengage the catch from the slot in the light housing. Support the glass lens cover to prevent it from falling. 6. (B) Gently pry the lens off by moving the screwdriver handle away from the oven wall. The lens should detach easily. Do not attempt to force it. 7. Screw the glass cover back on. 8. Turn power back on at the main power supply (fuse or breaker box). To replace the halogen bulb on the oven sidewall: Tools required Narrow flat blade screwdriver (blade tip width 1/ 5" (5 mm) or less to fit in slot). Flashlight (to see socket holes to plug in bulb prongs). 1. Turn off power to the oven at the main power supply (fuse or breaker box). 2. Remove oven racks if necessary to provide access to the bulb housing. 3. Optional: remove oven door to provide easier access and visibility. 4. Insert the tip of a narrow flat blade screwdriver between the metal clips at about a 40° angle. The screwdriver blade must be able to pass between the metal clips to reach the inner catch. 7. Pull the halogen bulb from its socket. If it is difficult to grasp the bulb using one hand, use both forefingers to pinch behind the rounded part of the bulb, then pull the bulb out using both hands. 8. Replace the halogen bulb. Grasp the new bulb with a clean, dry cloth. Align the bulb prongs with the socket holes and press into place. Direct finger contact with the bulb may cause premature bulb failure. 9. Put the glass cover back on by inserting it into the mounting clip and pressing the end nearest you into the housing until it locks into place. 10.Turn power back on at the main power supply (fuse or breaker box). 27
-
 1
1 -
2
-
3
-
4
-
5
-
6
-
7
-
8
-
9
-
10
-
11
-
12
-
13
-
14
-
15
-
16
-
17
-
18
-
19
-
20
-
21
-
 22
22 -
 23
23 -
 24
24 -
 25
25 -
 26
26 -
 27
27 -
 28
28 -
 29
29 -
 30
30 -
 31
31 -
 32
32 -
33
-
34
-
35
-
36
-
37
-
38
-
39
-
40
-
41
-
42
-
43
-
44
-
45
-
46
-
47
-
48
-
49
-
50
-
51
-
52
-
53
-
54
-
55
-
56
-
57
-
58
-
59
-
60
-
61
-
62
-
63
-
64
-
65
-
66
-
67
-
68
-
69
-
70
-
71
-
72
-
73
-
74
-
75
-
76
-
77
-
78
-
79
-
80
-
81
-
82
-
83
-
84
-
85
-
86
-
87
-
88
-
89
-
90
-
91
-
92
-
93
-
94
-
95
-
96
-
97
-
98
-
99
-
100
-
101
-
102
-
103
-
104
-
105
-
106
-
107
-
108
-
109
-
110
-
111
-
112
 |
 |
