Thermador MEDMCW31JP User Manual - Page 29
Service
 |
View all Thermador MEDMCW31JP manuals
Add to My Manuals
Save this manual to your list of manuals |
Page 29 highlights
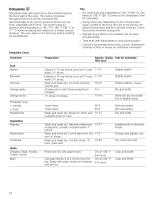
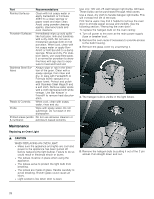
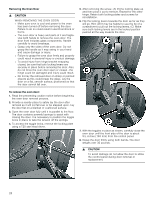
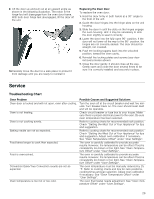
9. Lift the door up and pull out at an upward angle as shown in the following illustration. The notch in the hinge foot will disengage from the oven door frame. With both door hinge feet disengaged, lift the door off the unit. 10.Carefully move the door to a safe place to protect it from damage until you are ready to reinstall it. Replacing the Oven Door To replace the oven door: 1. Hold the door firmly in both hands at a 30° angle to the front of the unit. 2. Guide the door hinges into the hinge slots on the unit housing. 3. Slide the door in until the slots on the hinges engage the oven housing. Hint: it may be necessary to rock the door slightly to seat it correctly. 4. Lower the door into the fully open 90° position. If the door will not lower all the way to the 90° position, the hinges are not correctly seated. The door should be straight, not crooked. 5. Push the locking toggles back into the unlocked position, toward the oven cavity. 6. Reinstall the locking plates and screws (see door removal process above). 7. Close the door gently. It should close all the way. Gently open and close the door several times to be sure it is correctly installed and securely in place. Service Troubleshooting Chart Oven Problem Oven door is locked and will not open, even after cooling. Oven is not heating. Oven is not cooking evenly. Baking results are not as expected. Food takes longer to cook than expected. Food is overcooked. Convection Bake/True Convection results are not as expected. Oven temperature is too hot or too cold. Possible Causes and Suggested Solutions Turn the oven off at the circuit breaker and wait five minutes. Turn breaker back on. The oven should reset itself and will be operable. Check circuit breaker or fuse box to your house. Make sure there is proper electrical power to the oven. Be sure oven temperature has been selected. Refer to cooking charts for recommended rack position. Check "Getting the Most Out of Your Appliance" for tips and suggestion. Refer to cooking charts for recommended rack position. Check "Getting the Most Out of Your Appliance" for tips and suggestion. Adjust oven calibration if necessary. See "Oven Temperature Offset" under "User Settings". The oven is carefully calibrated to provide accurate results. However, the temperature can be offset if food is consistently too brown or too light. See "Oven Temperature Offset" under "User Settings". The oven is carefully calibrated to provide accurate results. However, the temperature can be offset if food is consistently too brown or too light. See "Oven Temperature Offset" under "User Settings". The oven temperature must be manually reduced by 25 °F. Refer to cooking charts and tips for rack positions, cooking times and pan selection. Adjust oven calibration if necessary. See "Oven Temperature Offset" under "User Settings". The oven thermostat needs adjustment. See "Oven Temperature Offset" under "User Settings". 29
-
 1
1 -
2
-
3
-
4
-
5
-
6
-
7
-
8
-
9
-
10
-
11
-
12
-
13
-
14
-
15
-
16
-
17
-
18
-
19
-
20
-
21
-
22
-
23
-
 24
24 -
 25
25 -
 26
26 -
 27
27 -
 28
28 -
 29
29 -
 30
30 -
 31
31 -
 32
32 -
 33
33 -
 34
34 -
35
-
36
-
37
-
38
-
39
-
40
-
41
-
42
-
43
-
44
-
45
-
46
-
47
-
48
-
49
-
50
-
51
-
52
-
53
-
54
-
55
-
56
-
57
-
58
-
59
-
60
-
61
-
62
-
63
-
64
-
65
-
66
-
67
-
68
-
69
-
70
-
71
-
72
-
73
-
74
-
75
-
76
-
77
-
78
-
79
-
80
-
81
-
82
-
83
-
84
-
85
-
86
-
87
-
88
-
89
-
90
-
91
-
92
-
93
-
94
-
95
-
96
-
97
-
98
-
99
-
100
-
101
-
102
-
103
-
104
-
105
-
106
-
107
-
108
-
109
-
110
-
111
-
112
 |
 |
