Thermador PRD486EDG Installation Instructions - Page 8
FIG. 2A - Side View, FIG. 2B - Side View - accessories
 |
View all Thermador PRD486EDG manuals
Add to My Manuals
Save this manual to your list of manuals |
Page 8 highlights
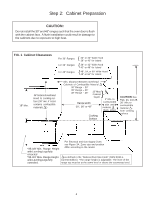
FIG. 2A - Side View Step 2: Cabinet Preparation Pot and Pan Shelf 3/8" FIG. 2B - Side View with Island Trim 4" ® ® 5 NOTE: For Island Trim installations, counter surface should have a cantilever edge meeting the back section of the island trim accessory. Cantilever Countertop NOTE: If an inner wall is used under the cantilever counter top, there should be a 1/8" gap from the rear of the range to the inner wall.
-
 1
1 -
2
-
 3
3 -
 4
4 -
 5
5 -
 6
6 -
 7
7 -
 8
8 -
 9
9 -
 10
10 -
 11
11 -
 12
12 -
 13
13 -
14
-
15
-
16
-
17
-
18
-
19
-
20
-
21
-
22
-
23
-
24
-
25
-
26
-
27
-
28
-
29
-
30
-
31
-
32
-
33
-
34
-
35
-
36
-
37
-
38
-
39
-
40
-
41
-
42
-
43
-
44
-
45
-
46
-
47
-
48
 |
 |

5
Step 2:
Cabinet Preparation
FIG. 2A - Side View
3/8"
4"
➤
➤
NOTE:
For Island Trim installations,
counter surface should have a
cantilever edge meeting the back
section of the island trim
accessory.
NOTE:
If an inner wall is used under the
cantilever counter top, there
should be a 1/8" gap from the rear
of the range to the inner wall.
Cantilever Countertop
with Island Trim
FIG. 2B - Side View
Pot and
Pan
Shelf