Thermador PRG366EG Installation Instructions - Page 20
Warning
 |
View all Thermador PRG366EG manuals
Add to My Manuals
Save this manual to your list of manuals |
Page 20 highlights
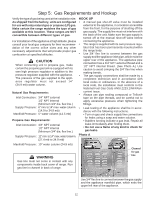
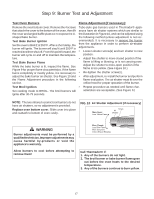
Step 9: Burner Test and Adjustment Test Oven Burners Remove the oven bottom cover. Remove the 4 screws that attach the cover to the bottom of the oven, then lift the cover and angled baffle plate out to expose the Ushaped bake burner. Test Bake Burner Ignition Set the oven to BAKE at 350°F. After a short delay, the burner will ignite. The burner will stay lit until 350°F is reached and then shut off. From this point forward, the burner will cycle on and off to maintain the temperature. Test Bake Burner Flame While the bake burner is lit, inspect the flame. See Figure 9 for proper flame characteristics. If the flame burns completely or mostly yellow, it is necessary to adjust the bake burner air shutter. See Figure 10 and the Flame Adjustment procedure in the following section. Test Broil Ignition Set cooking mode to BROIL. The broil burners will ignite after 30-75 seconds. Flame Adjustment (if necessary): Tube-style gas burners used in Thermador© appliances have air shutter systems which are similar to the illustration in Figure 10, and can be adjusted using the following method (unless adjustment is not recommended). It is necessary to remove the burner from the appliance in order to perform air-shutter adjustments. • Loosen shutter screw(s) and turn shutter to new position. • Adjust the shutter to more-closed position if the flame is lifting or blowing, or is not carrying over. Adjust the shutter to more-open position if the flame is too yellow. (See Figure 10.) • Re-tighten the shutter screw(s). • After adjustment, re-install the burner and perform flame evaluation. The air shutter must fit over the orifice hood for proper operation of the burner. • Repeat procedure as needed until flame characteristics are acceptable. (See Figure 9.) NOTE: The two infrared ceramic broil burners do not have air shutters, so no adjustment is provided. Replace oven bottom cover. Slide cover into place and reattach to bottom of oven cavity. FIG. 10 Air Shutter Adjustment (if necessary) More Open: Less Yellow Flame Screw Air Shutter WARNING Burner adjustments must be performed by a qualified technician. Improper adjustments may cause harmful by-products or void the appliance's warranty. Allow burners to cool before attempting to remove them! More Closed: Less Blue Flame More Carryover Less Lifting or Blowing Call Thermador® if: 1. Any of the burners do not light. 2. The broil burner or bake burner flame goes out before the oven heats to the desired temperature. 3. Any of the burners continue to burn yellow. 17
-
 1
1 -
2
-
3
-
4
-
5
-
6
-
7
-
8
-
9
-
10
-
11
-
12
-
13
-
14
-
 15
15 -
 16
16 -
 17
17 -
 18
18 -
 19
19 -
 20
20 -
 21
21 -
 22
22 -
 23
23 -
 24
24 -
 25
25 -
26
-
27
-
28
-
29
-
30
-
31
-
32
-
33
-
34
-
35
-
36
-
37
-
38
-
39
-
40
-
41
-
42
-
43
-
44
 |
 |