Thermador PRG366EG Installation Instructions - Page 7
FIG. 1, Cabinet, Clearances
 |
View all Thermador PRG366EG manuals
Add to My Manuals
Save this manual to your list of manuals |
Page 7 highlights
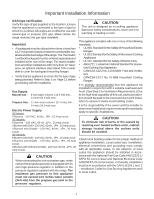
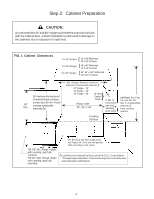
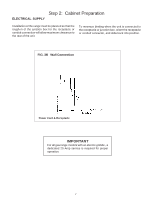
Step 2: Cabinet Preparation CAUTION: Do not install the 30" and 48" ranges such that the oven door is flush with the cabinet face. A flush installation could result in damage to the cabinets due to exposure to high heat. ® ® ® ® } } } FIG. 1 Cabinet Clearances For 30" Ranges For 36" Ranges For 48" Ranges 30" or 36" Wide Hood 36" or 42" for Island 36" or 42" Wide Hood 42" or 48" for Island 48" , 54", or 60" Wide Hood 48" or 54" for Island ® 36" minimum from bottom of Overhead Hood to cooking surface (also 36"min. if hood 18" containscombustible Min. materials ) ® Min. Distance Between Overhead ® Cabinets of Combustible Material Ð 30" Range - 30" 36" Range - 36" 48" Range - 48" } 13" Max. Cabinet Depth 3" Min. to Range width 30", 36" or 48" combustible ® side wall material Ð , (both sides) Cooking Surface CAUTION: See Figs. 2A, and 2B. 36" Min. to combustible material Ð , from cooking surface ® ® ® ® • *35-7/8" Min. Range Height with Leveling Legs fully retracted *36-3/4" Max. Range Height with Leveling Legs fully extended. For Electrical and Gas Supply Zone, see Figure 3A. Zone size and position differ according to the model. as defined in the "National Fuel Gas Code" (ANSI Z223.1, Current Edition). *The range height is adjustable. The level of the range top must be at the same level or above the countertop level. 4
-
 1
1 -
 2
2 -
 3
3 -
 4
4 -
 5
5 -
 6
6 -
 7
7 -
 8
8 -
 9
9 -
 10
10 -
 11
11 -
 12
12 -
13
-
14
-
15
-
16
-
17
-
18
-
19
-
20
-
21
-
22
-
23
-
24
-
25
-
26
-
27
-
28
-
29
-
30
-
31
-
32
-
33
-
34
-
35
-
36
-
37
-
38
-
39
-
40
-
41
-
42
-
43
-
44
 |
 |
