Thermador PRG486JDG Installation Manual - Page 27
Installing the Leg Covers, Griddle Tilt Adjustment - cooktop
 |
View all Thermador PRG486JDG manuals
Add to My Manuals
Save this manual to your list of manuals |
Page 27 highlights
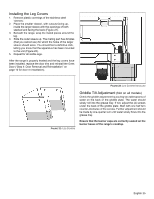
Installing the Leg Covers 1. Remove plastic coverings of the stainless steel 'sleeves'. 2. Place the smaller 'sleeve', with cutouts facing up, inside the larger sleeve with the openings of both stacked and facing the back (Figure 21). 3. Beneath the range, wrap the mated pieces around the leg. 4. Slide the outer sleeve up. The mating part has dimples (that you cannot see) for which the holes of the larger sleeve should seize. You should feel a definitive click, letting you know that the apparatus has been mounted to the unit (Figure 22). 5. Repeat for all visible legs. After the range is properly leveled and the leg covers have been installed, replace the door trim and reinstall the Oven Door ("Step 4: Door Removal and Reinstallation" on page 10 for door re-installation). FIGURE 22: LEG COVERS INSTALLED FIGURE 21: LEG COVERS Griddle Tilt Adjustment (Not on all models) Check the griddle adjustment by pouring two tablespoons of water on the back of the griddle plate. The water should slowly roll into the grease tray. If not, adjust the (2) screws under the back of the griddle plate. Start with one half turn counter-clockwise of the screws. Further adjustment should be made by one-quarter turn until water slowly flows into the grease tray. Ensure that the burner caps are correctly seated on the burner bases of the range's cooktop. English 25
-
 1
1 -
2
-
3
-
4
-
5
-
6
-
7
-
8
-
9
-
10
-
11
-
12
-
13
-
14
-
15
-
16
-
17
-
18
-
19
-
20
-
21
-
 22
22 -
 23
23 -
 24
24 -
 25
25 -
 26
26 -
 27
27 -
 28
28 -
 29
29 -
 30
30 -
 31
31 -
 32
32 -
33
-
34
-
35
-
36
-
37
-
38
-
39
-
40
-
41
-
42
-
43
-
44
-
45
-
46
-
47
-
48
-
49
-
50
-
51
-
52
-
53
-
54
-
55
-
56
-
57
-
58
-
59
-
60
-
61
-
62
-
63
-
64
-
65
-
66
-
67
-
68
-
69
-
70
-
71
-
72
-
73
-
74
-
75
-
76
-
77
-
78
-
79
-
80
-
81
-
82
-
83
-
84
-
85
-
86
-
87
-
88
-
89
-
90
-
91
-
92
-
93
-
94
-
95
-
96
 |
 |
