Thermador T36BT820NS Installation Manual - Page 11
Installation instructions - parts
 |
View all Thermador T36BT820NS manuals
Add to My Manuals
Save this manual to your list of manuals |
Page 11 highlights
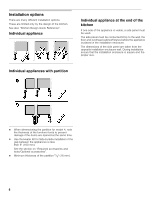
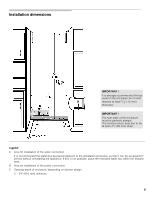
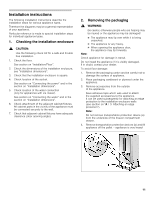
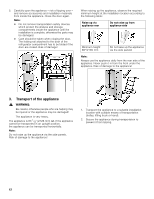
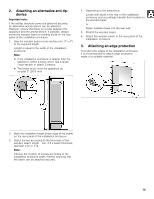
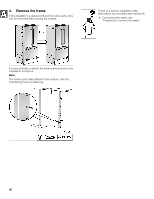
Installation instructions The following installation instructions describe the installation steps for various appliance types. Therefore the diagrams may be a general representation of your appliance. Particular reference is made to special installation steps for individual appliance types. 1. Checking the installation enclosure , CAUTION: Use the following check list for a safe and trouble free installation. 1. Check the floor. See section on "Installation/Floor". 2. Check the dimensions of the installation enclosure, see "Installation dimensions". 3. Check that the installation enclosure is square. 4. Check location of the socket. See section on "Connecting the power" and in the section on "Installation dimensions". 5. Check location of the water connection (only for appliances with ice maker). See section on "Connecting the water" and in the section on "Installation dimensions". 6. Check attachment of the adjacent cabinet/fixtures. All cabinet parts in the vicinity of the appliance must be connected securely to the wall. 7. Check that adjacent cabinet/fixtures have adequate clearance (door opening angle). 2. Removing the packaging , WARNING: Be careful, otherwise people who are helping may be injured or the appliance may be damaged! The appliance may tip over while it is being unpacked. The appliance is very heavy. When opening the appliance door, the appliance may tip forwards. Note: Check appliance for damage in transit. Do not install the appliance if it is visibly damaged. If in doubt, contact your dealer. To avoid floor damage: 1. Remove the packaging carton and be careful not to damage the surface of appliance. 2. Place packaging cardboard or plywood under the appliance. 3. Remove accessories from the outside of the appliance. Save adhesive tape which was used to attach the supplied accessories to the appliance. It can be used subsequently for attaching an edge protection to the installation enclosure walls (see section on "A / 3. Attaching an edge protection"). Note: Do not remove transportation protection device (a) from the underside of the freezer compartment drawer. 4. Remove transportation protection devices (b) and lift appliance off the pallet - appliance is very heavy! 11
-
 1
1 -
2
-
3
-
4
-
5
-
 6
6 -
 7
7 -
 8
8 -
 9
9 -
 10
10 -
 11
11 -
 12
12 -
 13
13 -
 14
14 -
 15
15 -
 16
16 -
17
-
18
-
19
-
20
-
21
-
22
-
23
-
24
-
25
-
26
-
27
-
28
-
29
-
30
-
31
-
32
-
33
-
34
-
35
-
36
-
37
-
38
-
39
-
40
-
41
-
42
-
43
-
44
-
45
-
46
-
47
-
48
-
49
-
50
-
51
-
52
-
53
-
54
-
55
-
56
-
57
-
58
-
59
-
60
-
61
-
62
-
63
-
64
 |
 |
