Toshiba 36AF43 User Manual - Page 11
Two VCRs, This connection allows you to record dub/edit from VCR 1
 |
View all Toshiba 36AF43 manuals
Add to My Manuals
Save this manual to your list of manuals |
Page 11 highlights
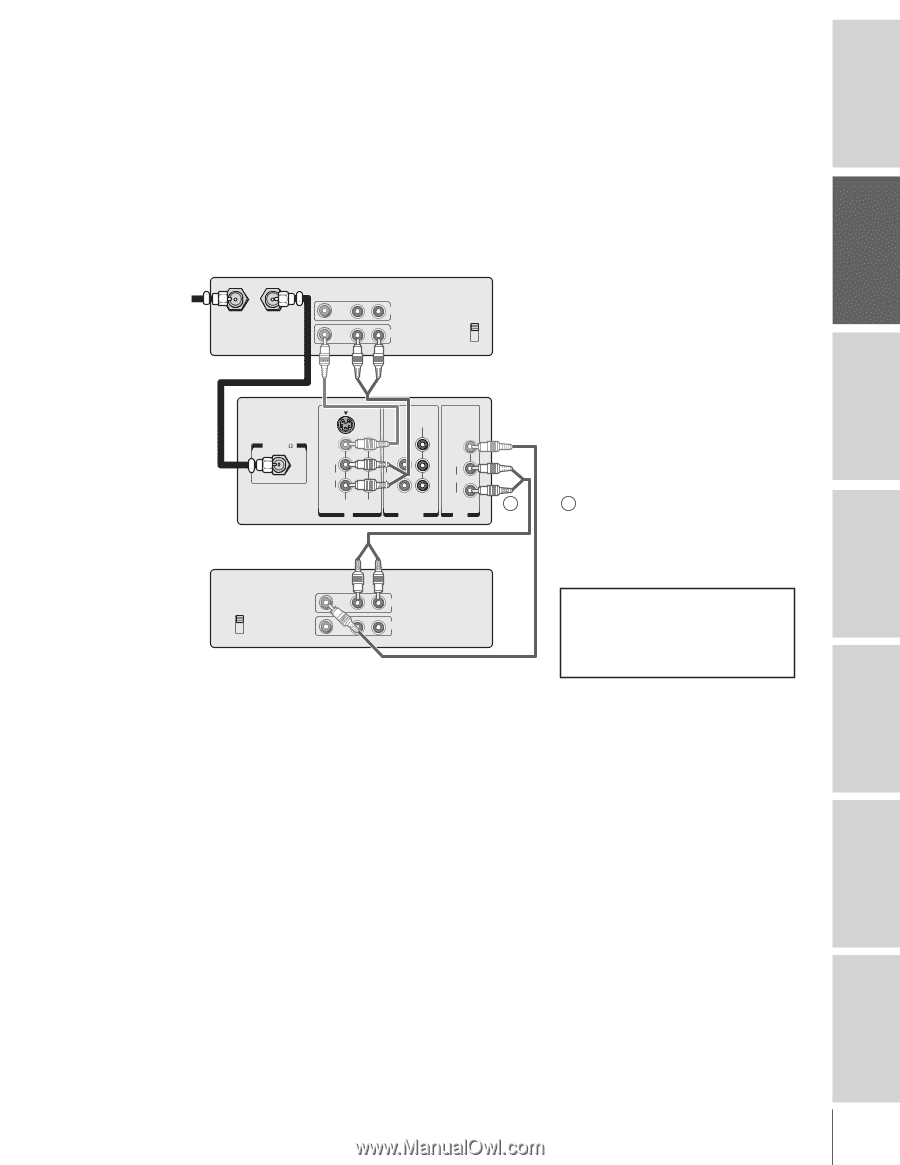
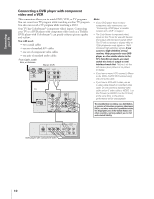
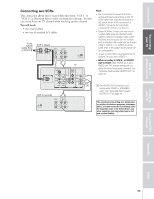
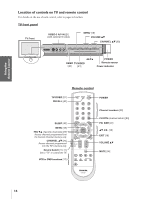
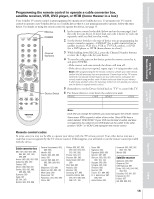
Introduction Connecting your TV Using the Remote Control Connecting two VCRs This connection allows you to record (dub/edit) from "VCR 1" to "VCR 2" (as illustrated below) while watching the videotape. You also can record from one TV channel while watching another channel. You will need: • two coaxial cables • two sets of standard A/V cables From Cable, Cable Box, or Antenna VCR 1 (plays) VIDEO AUDIO LR IN IN from ANT OUT to TV CH 3 OUT CH 4 TV S-VIDEO COLOR STREAM INPUT ANT( 75 ) VIDEO L/ MONO Y VIDEO L PB L / MONO AUDIO AUDIO PR AUDIO VAR/FIX R R R VIDEO 1 VIDEO 2 * IN DVD IN OUT VCR 2 (records) CH 3 CH 4 VIDEO AUDIO L R IN OUT Note: • Do not connect the same VCR to the output and input connections on the TV at the same time. (See the illustration at left, which shows VCR1 connected to VIDEO-1 IN on the TV, and VCR2 connected to A/V OUT on the TV.) • If your VCR has S-video, you can use an S-video cable (plus the standard audio cables) instead of a standard video cable for better picture quality. Do not connect both a standard video cable and an S-video cable to VIDEO-1 (or VIDEO-3) at the same time, or the picture performance will be unacceptable. • To dub or edit, VCR 2 must select Line IN, and the TV must select VIDEO-1. • When recording to VCR 2 , set AUDIO OUT to FIXED. With AUDIO OUT set to FIXED, the TV's volume setting will not affect the sound level being recorded. See "Selecting fixed/variable AUDIO OUT" on page 39. * The AUDIO OUT connections can output either FIXED or VARIABLE audio. See "Selecting fixed/variable AUDIO OUT" on page 39. The unauthorized recording, use, distribution, or revision of television programs, videotapes, DVDs, and other materials is prohibited under the Copyright Laws of the United States and other countries, and may subject you to civil and criminal liability. Setting up your TV Using the TV's Features Appendix Index 11
-
 1
1 -
2
-
3
-
4
-
5
-
 6
6 -
 7
7 -
 8
8 -
 9
9 -
 10
10 -
 11
11 -
 12
12 -
 13
13 -
 14
14 -
 15
15 -
 16
16 -
17
-
18
-
19
-
20
-
21
-
22
-
23
-
24
-
25
-
26
-
27
-
28
-
29
-
30
-
31
-
32
-
33
-
34
-
35
-
36
-
37
-
38
-
39
-
40
-
41
-
42
-
43
-
44
-
45
-
46
-
47
 |
 |