Toshiba 46WM48 Owners Manual - Page 6
Connecting external equipment - tv
 |
View all Toshiba 46WM48 manuals
Add to My Manuals
Save this manual to your list of manuals |
Page 6 highlights
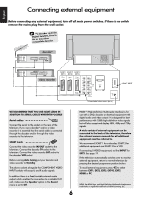
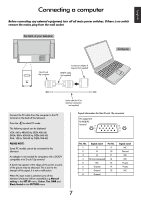
English Connecting external equipment Before connecting any external equipment, turn off all main power switches. If there is no switch remove the mains plug from the wall socket. * ☛DAcoiigrmiotpaaraladtSinebaycltoeeodldtlehietreecrc,oodFureelrde. be to decoder* IN OUT TV VCR IN IN/OUT OUT SAT SCART 1 SCART 2 SCART 3 (EXT 1) (EXT 2) (EXT 3) video recorder HDMI™ INPUT HDMI COMPONENT VIDEO INPUT (EXT 4) WE RECOMMEND THAT YOU USE SCART LEADS IN ADDITION TO AERIAL CABLES WHEREVER POSSIBLE Aerial cables: Connect the aerial to the socket on the rear of the television. If you use a decoder* and/or a video recorder it is essential that the aerial cable is connected through the decoder and/or through the video recorder to the television. SCART leads: Connect the video recorder IN/OUT socket to the television. Connect the decoder TV socket to the television. Connect the video recorder SAT socket to the decoder VCR socket. Before running Auto tuning put your decoder and video recorder to Standby. The phono sockets alongside the COMPONENT VIDEO INPUT sockets will accept L and R audio signals. In addition there is a fixed/variable external audio output which enables the connection to a suitable Hi-Fi unit, make sure the Speaker option in the Sound menu is set to Off. HDMI™ (High-Definition Multimedia Interface) is for use with a DVD, decoder or electrical equipment with digital audio and video output. It is designed for best performance with 1080i high-definition video signals but will also accept and display 480i, 480p and 720p signals. A wide variety of external equipment can be connected to the back of the television, therefore the relevant owners manuals for all additional equipment must be referred to. We recommend SCART 1 for a decoder, SCART 2 for additional equipment and SCART 3 for a VCR. If connecting S-VIDEO equipment, set the INPUT for EXT3. See page 19. If the television automatically switches over to monitor external equipment, return to normal television by pressing the desired programme position button. B To recall external equipment, press to select between EXT1, EXT2, EXT3, EXT4C, EXT5, HDMI or PC. HDMI, the HDMI logo, and High-Definition Multimedia Interface are trademarks or registered trademarks of HDMI Licensing, LLC. 6
-
 1
1 -
 2
2 -
 3
3 -
 4
4 -
 5
5 -
 6
6 -
 7
7 -
 8
8 -
 9
9 -
 10
10 -
 11
11 -
 12
12 -
13
-
14
-
15
-
16
-
17
-
18
-
19
-
20
-
21
-
22
-
23
-
24
-
25
-
26
-
27
-
28
-
29
-
30
-
31
-
32
-
33
-
34
-
35
-
36
-
37
-
38
-
39
-
40
-
41
-
42
-
43
-
44
-
45
-
46
-
47
-
48
-
49
-
50
-
51
-
52
-
53
-
54
-
55
-
56
-
57
-
58
-
59
-
60
-
61
-
62
-
63
-
64
-
65
-
66
-
67
-
68
-
69
-
70
-
71
-
72
-
73
-
74
-
75
-
76
-
77
-
78
-
79
-
80
-
81
-
82
-
83
-
84
-
85
-
86
-
87
-
88
-
89
-
90
-
91
-
92
-
93
-
94
-
95
-
96
-
97
-
98
-
99
-
100
-
101
-
102
-
103
-
104
-
105
-
106
-
107
-
108
-
109
-
110
-
111
-
112
-
113
-
114
-
115
-
116
-
117
-
118
-
119
-
120
-
121
-
122
-
123
-
124
-
125
-
126
-
127
-
128
-
129
-
130
-
131
-
132
-
133
-
134
-
135
-
136
-
137
-
138
-
139
-
140
-
141
-
142
-
143
-
144
-
145
-
146
-
147
-
148
-
149
-
150
-
151
-
152
-
153
-
154
-
155
-
156
-
157
-
158
-
159
-
160
-
161
-
162
-
163
-
164
-
165
-
166
-
167
-
168
-
169
-
170
-
171
-
172
-
173
-
174
-
175
-
176
-
177
-
178
-
179
-
180
-
181
-
182
-
183
-
184
 |
 |
