Toshiba 46WM48 Owners Manual - Page 7
Connecting a computer - parts
 |
View all Toshiba 46WM48 manuals
Add to My Manuals
Save this manual to your list of manuals |
Page 7 highlights
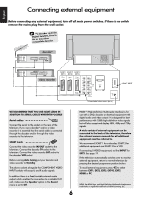
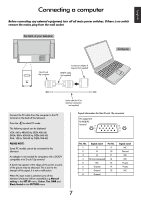
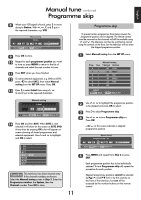
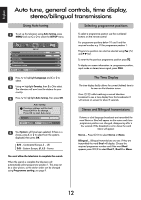
English Connecting a computer Before connecting any external equipment, turn off all main power switches. If there is no switch remove the mains plug from the wall socket. the back of your television Computer Mini D-sub 15p connector Conversion adaptor if required (not supplied) RGB PC cable (not supplied) Audio cable for PC to television connection (not supplied) Connect the PC cable from the computer to the PC terminal on the back of the television. B Press the to select PC mode. The following signals can be displayed: VGA: 640 x 480/60 Hz (VESA 480-60) SVGA: 800 x 600/60 Hz (VESA 600-60) XGA: 1024 x 768/60 Hz (VESA 768-60) PLEASE NOTE: Some PC models cannot be connected to this television. An adaptor is not needed for computers with a DOS/V compatible mini D-sub 15p terminal. A band may appear at the edges of the screen or parts of the picture may be obscured. This is due to the strength of the signal, it is not a malfunction. When PC input mode is selected some of the television's features will be unavailable e.g Manual setting in the SET UP menu, Colour, Tint, DNR and Black Stretch in the PICTURE menu. Signal information for Mini D-sub 15p connector Pin assignment for RGB/PC terminal Pin. No. Signal name Pin No. 1 R 9 2 G 10 3 B 11 4 NC (not connected) 12 5 NC 13 6 Ground 14 7 Ground 15 8 Ground Signal name NC Ground NC NC H-sync V-sync NC 7
-
 1
1 -
 2
2 -
 3
3 -
 4
4 -
 5
5 -
 6
6 -
 7
7 -
 8
8 -
 9
9 -
 10
10 -
 11
11 -
 12
12 -
13
-
14
-
15
-
16
-
17
-
18
-
19
-
20
-
21
-
22
-
23
-
24
-
25
-
26
-
27
-
28
-
29
-
30
-
31
-
32
-
33
-
34
-
35
-
36
-
37
-
38
-
39
-
40
-
41
-
42
-
43
-
44
-
45
-
46
-
47
-
48
-
49
-
50
-
51
-
52
-
53
-
54
-
55
-
56
-
57
-
58
-
59
-
60
-
61
-
62
-
63
-
64
-
65
-
66
-
67
-
68
-
69
-
70
-
71
-
72
-
73
-
74
-
75
-
76
-
77
-
78
-
79
-
80
-
81
-
82
-
83
-
84
-
85
-
86
-
87
-
88
-
89
-
90
-
91
-
92
-
93
-
94
-
95
-
96
-
97
-
98
-
99
-
100
-
101
-
102
-
103
-
104
-
105
-
106
-
107
-
108
-
109
-
110
-
111
-
112
-
113
-
114
-
115
-
116
-
117
-
118
-
119
-
120
-
121
-
122
-
123
-
124
-
125
-
126
-
127
-
128
-
129
-
130
-
131
-
132
-
133
-
134
-
135
-
136
-
137
-
138
-
139
-
140
-
141
-
142
-
143
-
144
-
145
-
146
-
147
-
148
-
149
-
150
-
151
-
152
-
153
-
154
-
155
-
156
-
157
-
158
-
159
-
160
-
161
-
162
-
163
-
164
-
165
-
166
-
167
-
168
-
169
-
170
-
171
-
172
-
173
-
174
-
175
-
176
-
177
-
178
-
179
-
180
-
181
-
182
-
183
-
184
 |
 |
