Toshiba D-R4 Installation Guide - English - Page 30
A: Initial settings
 |
UPC - 022265411674
View all Toshiba D-R4 manuals
Add to My Manuals
Save this manual to your list of manuals |
Page 30 highlights
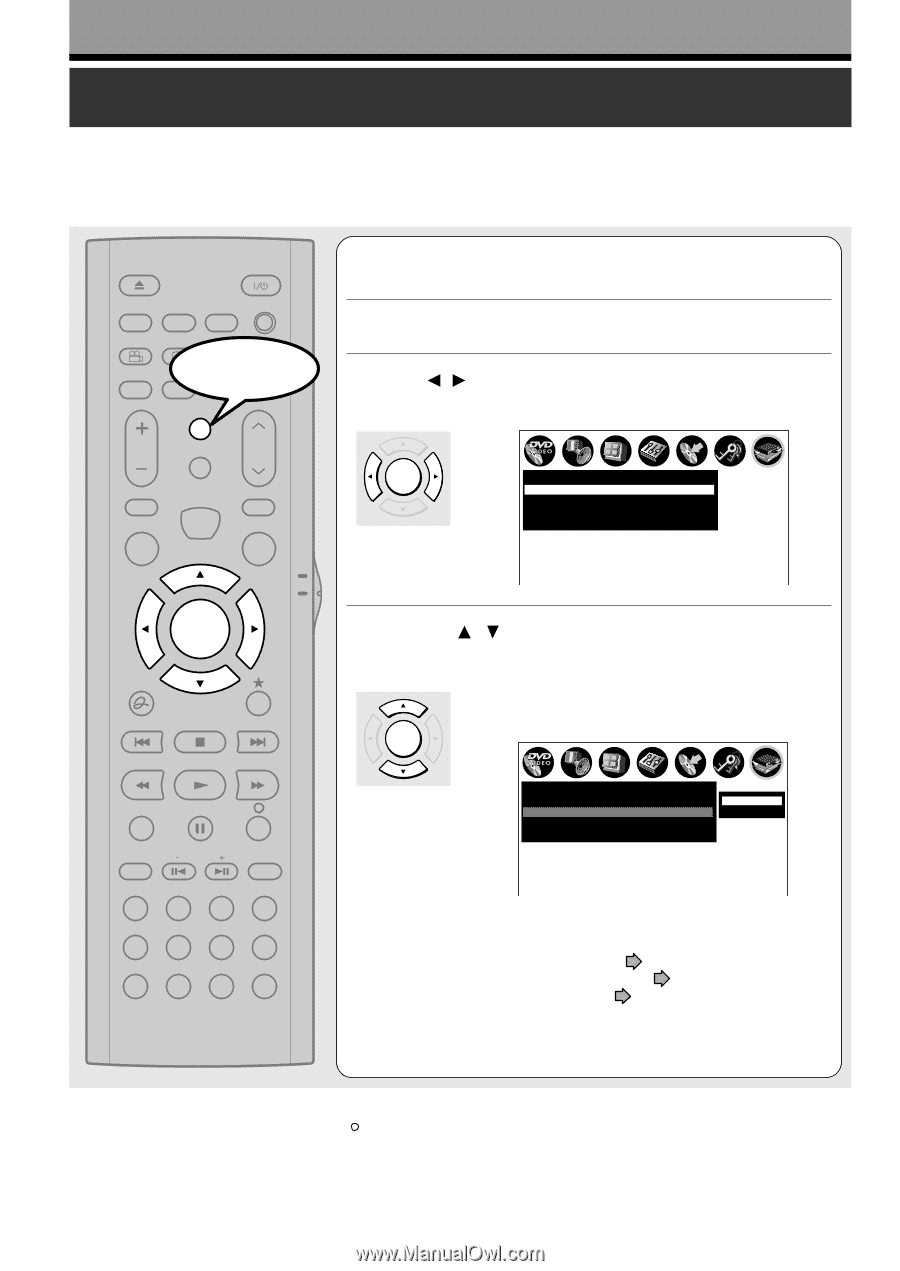
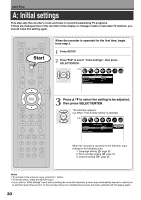
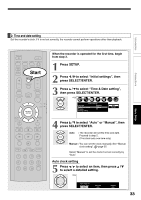
Basic Setup A: Initial settings This step sets the recorder's clock and tuner to record broadcasting TV programs. If there are discrepancies in the recorder's time display or changes made to receivable TV stations, you should make this setting again. OPEN/CLOSE DISPLAY FL SELECT DIMMER PROGRESSIVE ANGLE SUBTITLE AUDIO/SAP FREEZE Start REMAIN REC MODE EXTEND ZOOM SETUP VOL TIMESLIP CH MUTE INPUT SELECT TOP MENU EASY NAVI MENU SELECT/ ENTER INSTANT REPLAY QUICK MENU TV DVD INSTANT SKIP SKIP REV STOP SKIP FWD REV PLAY FWD REC SEARCH T ADJUST CHP DIVIDE 1 2 3 +10 4560 CLEAR 789 When the recorder is operated for the first time, begin from step 3. 1 Press SETUP. 2 Press / to select "Initial settings", then press SELECT/ENTER. e.g. SELECT/ ENTER Initial settings Language Time & Date setting English Manual TV/Cable TV Channel setting SETUP 3 Press / to select the setting to be adjusted, then press SELECT/ENTER. The submenu appears. e.g. When "Time & Date setting" is selected: SELECT/ ENTER e.g. Initial settings Language Time & Date setting English Manual TV/Cable TV Channel setting Auto Manual SETUP When the recorder is operated for the first time, input settings in the following order. 1: Language setting page 32 2: Time and date setting page 33 3: Channel setting page 36 Notes • To go back to the previous menu, press the button. • To exit the menu, press the SETUP button. • If you exit the "Initial settings" menu without setting the clock and channels, a menu may automatically appear to remind you to set them each time you turn on the recorder. Once you complete this process, the menu reminder will not appear again. 30
-
 1
1 -
2
-
3
-
4
-
5
-
6
-
7
-
8
-
9
-
10
-
11
-
12
-
13
-
14
-
15
-
16
-
17
-
18
-
19
-
20
-
21
-
22
-
23
-
24
-
 25
25 -
 26
26 -
 27
27 -
 28
28 -
 29
29 -
 30
30 -
 31
31 -
 32
32 -
 33
33 -
 34
34 -
 35
35 -
36
-
37
-
38
-
39
-
40
-
41
-
42
-
43
-
44
-
45
-
46
-
47
-
48
-
49
-
50
-
51
-
52
 |
 |