Toshiba D-R4 Installation Guide - English - Page 45
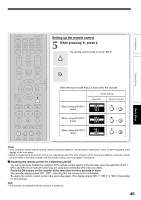
Setting up the remote control, While pressing, press 2.
 |
UPC - 022265411674
View all Toshiba D-R4 manuals
Add to My Manuals
Save this manual to your list of manuals |
Page 45 highlights
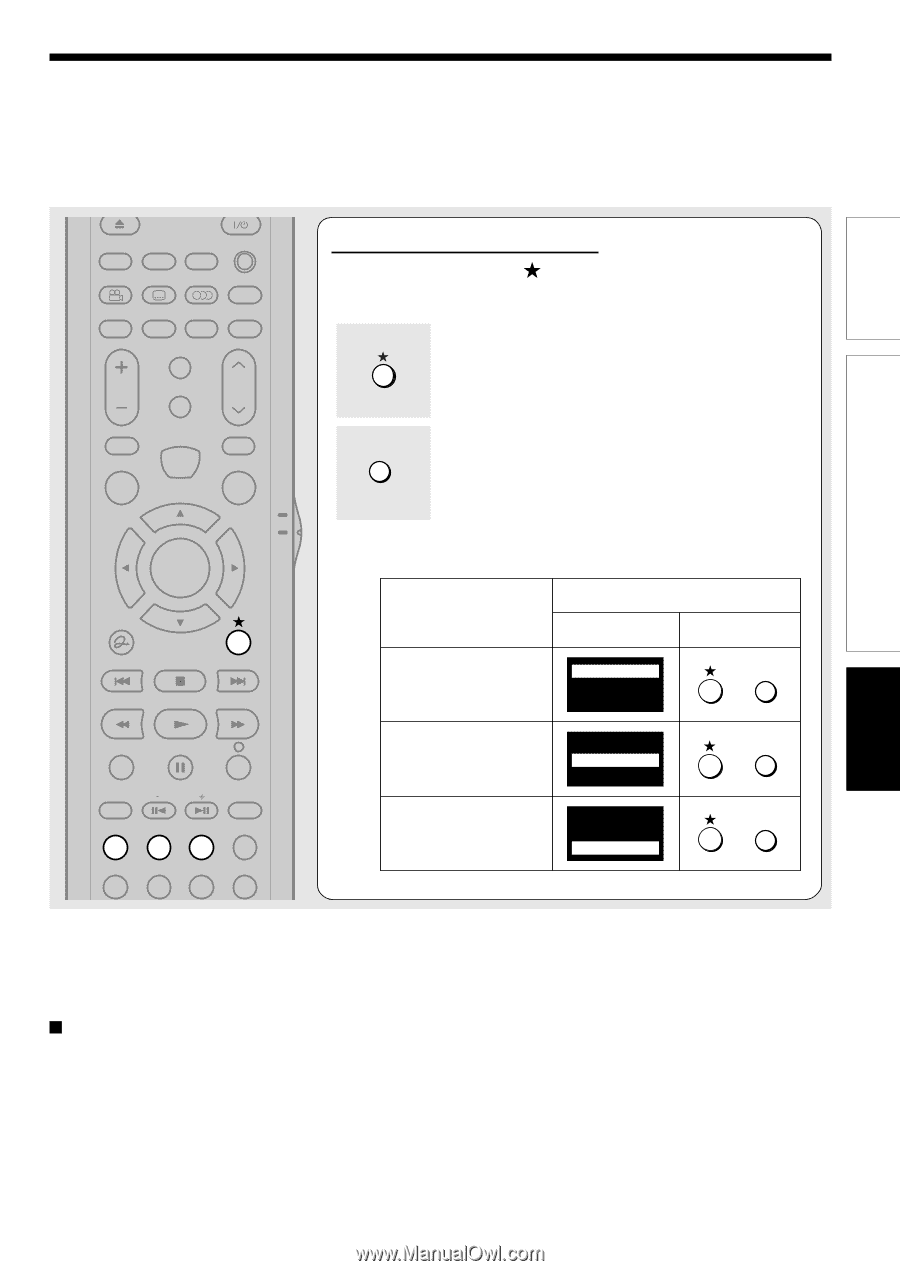
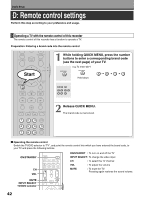
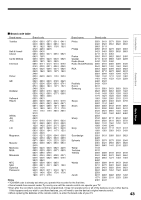
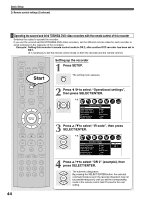
Introduction Connections DISPLAY FL SELECT DIMMER PROGRESSIVE ANGLE SUBTITLE AUDIO/SAP FREEZE REMAIN REC MODE EXTEND ZOOM SETUP VOL TIMESLIP CH MUTE INPUT SELECT TOP MENU EASY NAVI MENU SELECT/ ENTER INSTANT REPLAY QUICK MENU TV DVD INSTANT SKIP SKIP REV STOP SKIP FWD REV PLAY FWD REC SEARCH T ADJUST CHP DIVIDE 1 2 3 +10 4560 Setting up the remote control 5 While pressing , press 2. The remote control mode is set to '"DR 2". 2 Select the same mode that you have set to the recorder. Mode setting Recorder Remote control When using with DR 1 mode DR 1 DR 2 DR 3 +1 When using with DR 2 mode DR 1 DR 2 DR 3 +2 When using with DR 3 mode DR 1 DR 2 DR 3 +3 Basic Setup Notes • If the recorder's mode and the remote control's mode are different, the recorder's mode (DR 1, DR 2 or DR 3) appears in the display of the front panel. • When the batteries of the remote control are replaced or when the time indicator of the front panel flashes, check the remote control modes of both the recorder and the remote control, and re-program if necessary. Disabling the remote control for a temporary period You can temporarily disable the reception of the remote control signals at the recorder, when the selection of DR 1, DR 2 and DR 3 is not sufficient while you are using several Toshiba DVD video recorders. Press the CH buttons on the recorder at the same time for three seconds or more. The recorder display shows "DR - OFF", indicating that the remote control is disabled. To enable the remote control, perform the same step again. (The display shows "DR-1", "DR-2" or "DR-3" depending on your setting.) Note • This function is available while the recorder is turned on. 45
-
 1
1 -
2
-
3
-
4
-
5
-
6
-
7
-
8
-
9
-
10
-
11
-
12
-
13
-
14
-
15
-
16
-
17
-
18
-
19
-
20
-
21
-
22
-
23
-
24
-
25
-
26
-
27
-
28
-
29
-
30
-
31
-
32
-
33
-
34
-
35
-
36
-
37
-
38
-
39
-
 40
40 -
 41
41 -
 42
42 -
 43
43 -
 44
44 -
 45
45 -
 46
46 -
 47
47 -
 48
48 -
 49
49 -
 50
50 -
51
-
52
 |
 |