Toshiba D-VR5SU User Manual - Page 29
Setting the disc / Other
 |
View all Toshiba D-VR5SU manuals
Add to My Manuals
Save this manual to your list of manuals |
Page 29 highlights
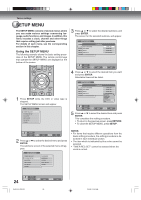
Setting the disc / Other (SYSTEM SETUP) NOTES: • During finalizing, the cursor will move repeatedly. When the finalization finished, "FINALISING COMPLETED PRESS ENTER" will appear. Press ENTER to clear the screen. • The finalization process may require a few minutes to about 1 hour according to disc type or the amount of free space on the disc. • You can record or edit a finalized DVD-RW (in VR mode) by cancelling the finalizing, but you cannot do these operations with a DVD-RW (Video mode), or with a DVD-R. • You cannot playback a disc recorded on VR mode on a unit that does not support DVD-RW. • Even if you finalize a disc in the Video mode, the disc cannot be played back in some DVD players. • A DVD-R disc cannot be named after it is finalized. PROTECT DISC You can protect a disc to prevent the content recorded on it from being erased, edited or re-recorded. Only DVD-RAM and DVD-RW (in VR mode) can be protected. Select "PROTECT DISC" and select "ON" to protect the disc. To cancel the disc protection, select "OFF". UNDO FINALIZE You can cancel the finalization of a finalized DVD-RW (in VR mode). You cannot cancel the finalization for discs other than above. You can record or edit on a disc whose finalization has been canceled. Select "UNDO FINALIZE", and the screen below will appear. UNDO FINALIZE START CANCEL • When you select "START" and press ENTER, the cancelling finalization will start.The screen below will appear. UNFINALIZING PLEASE WAIT • When you select "CANCEL" and press ENTER, the DISC SETUP screen will appear. Various settings NOTES: • During unfinalizing, the cursor will move repeatedly. When cancelling finalization is complete, "UNDO FINALISING COMPLETED PRESS ENTER" will appear. Press ENTER to clear the screen. • The cancelling finalization process may require a few minutes to about 1 hour according to disc type or the amount of free space on the disc. • When the disc's finalization cannot be canceled, you cannot select "UNDO FINALIZE". DVD-RAM Physical Format Physically formats a DVD-RAM disc. Whenever you use a new disc for the first time, be sure to format it. NOTE: The physical format process may require about 1 hour according to disc condition. This section describes the other setting in SYSTEM SETUP Preparation: • Turn ON the TV and set it to the video input mode. • Select "OTHER" from "SYSTEM SETUP". For the procedure, see steps 1 to 3 in "Using the SETUP MENU" on page 24. SETUP MENU TIMER REC SET L A N G UOATGH E R SYSTEM SETUPDIMMER PA R E N TA L AV SETUP D I S P L AY / C A L L C L O C K REC SETUP DISC SETUP CH SETUP OTHER OTHER AU TO M AT I C ON DIMMER (Brightness of the display window) You may adjust the brightness or turn off the display on the front panel of the unit. Select "DIMMER" and select the display window status from the below. AUTOMATIC: When the power is on, the display win- dow appears bright. When the power is off, it appears dark. DIM: The window display always appears dark. OFF: When the power is on, the display win- dow appears dark. When the power is off, it is turned off. DISPLAY/CALL (Turning the screen dis- play "ON" or "OFF") You can turn off the screen display that is output to the TV screen by this unit. Select "DISPLAY/CALL", and select "ON" or "OFF". ON: The screen display appears. OFF: Nothing but the SETUP MENU and error mes- sages appear. 29 2J40101A P23-33 29 3/4/06, 10:43 AM
-
 1
1 -
2
-
3
-
4
-
5
-
6
-
7
-
8
-
9
-
10
-
11
-
12
-
13
-
14
-
15
-
16
-
17
-
18
-
19
-
20
-
21
-
22
-
23
-
 24
24 -
 25
25 -
 26
26 -
 27
27 -
 28
28 -
 29
29 -
 30
30 -
 31
31 -
 32
32 -
 33
33 -
 34
34 -
35
-
36
-
37
-
38
-
39
-
40
-
41
-
42
-
43
-
44
-
45
-
46
-
47
-
48
-
49
-
50
-
51
-
52
-
53
-
54
-
55
-
56
-
57
-
58
-
59
-
60
-
61
-
62
-
63
-
64
-
65
-
66
-
67
-
68
-
69
-
70
-
71
-
72
-
73
-
74
-
75
-
76
-
77
-
78
-
79
-
80
-
81
-
82
-
83
-
84
-
85
-
86
-
87
-
88
-
89
-
90
-
91
-
92
 |
 |
