Toshiba D-VR5SU User Manual - Page 81
Dubbing, You can connect a DV format digital video camera to the DV IN, terminal to record from
 |
View all Toshiba D-VR5SU manuals
Add to My Manuals
Save this manual to your list of manuals |
Page 81 highlights
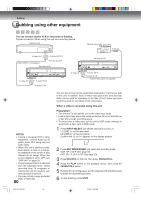
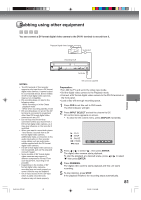
Dubbing using other equipment You can connect a DV format digital video camera to the DV IN terminal to record from it. Playback Digital Video Camera To DV OUT Recording VCR NOTES: • The DV terminal of this recorder supports only input from a DV format digital video camera. It cannot output to a connected device. Some models of DV format digital video cameras may be not compatible. • DV recording does not start in the following cases: - While recording or in the Chase playback mode - While timer recording standby mode • DV recording does not work if the DV terminal is connected to equipment other than DV format digital video camera,such as a PC. • Do not keep the DV terminal connected unless you record from a DV format digital video camera, as it may give influence on the recorder if operated. • When you want to record both stereo 1 and stereo 2 sounds from a DV format digital video camera, additionally make a connection to the audio input jacks on this recorder using cables such as audio/video cables supplied with the DV format digital video camera. • If a DV format digital video camera is not recognized, pull out the plug and connect it again. • Some models of DV format digital video cameras may support a different compression format. From such equipment, recording is not possible. • Depending on the models of DV format digital video cameras, recording may not work properly or some functions may be disabled. • On an input source from a DV tape which is partly recorded over, chapters may not made properly. 2J40101A P72-81 81 To DV IN DV cord (not supplied) Preparation: • Turn ON the TV and set to the video input mode. • Set the digital video camera to the Playback mode. • Connect a DV format digital video camera to the DV IN terminal on the front panel. • Load a disc with enough recording space. 1 Press DVD to set this unit to DVD mode. The DVD indicator will light. 2 Press INPUT SELECT and set the channel to DV. DV control menu appears on screen. • To clear the DV control menu, press DISPLAY repeatedly. Dubbing 1 : PLAY 3 : STOP 4 : PAUSE 9: F.FWD 8: REW 3 Press or to select " ", then press ENTER. The digital video camera starts playback. To stop the playback at a desired scene, press or "3" then press ENTER to select 4 Press DUBBING. The digital video camera starts playback and this unit starts recording. 5 To stop dubbing, press STOP. If the playback finished, the recording stops automatically. 81 3/4/06, 10:46 AM
-
 1
1 -
2
-
3
-
4
-
5
-
6
-
7
-
8
-
9
-
10
-
11
-
12
-
13
-
14
-
15
-
16
-
17
-
18
-
19
-
20
-
21
-
22
-
23
-
24
-
25
-
26
-
27
-
28
-
29
-
30
-
31
-
32
-
33
-
34
-
35
-
36
-
37
-
38
-
39
-
40
-
41
-
42
-
43
-
44
-
45
-
46
-
47
-
48
-
49
-
50
-
51
-
52
-
53
-
54
-
55
-
56
-
57
-
58
-
59
-
60
-
61
-
62
-
63
-
64
-
65
-
66
-
67
-
68
-
69
-
70
-
71
-
72
-
73
-
74
-
75
-
 76
76 -
 77
77 -
 78
78 -
 79
79 -
 80
80 -
 81
81 -
 82
82 -
 83
83 -
 84
84 -
 85
85 -
 86
86 -
87
-
88
-
89
-
90
-
91
-
92
 |
 |
