Toshiba Excite AT300 PDA08C-00200E Users Manual Canada; English - Page 23
Initial Setup, Turning off the power, Start, Settings, Not now, Google Location Service™, Finish
 |
View all Toshiba Excite AT300 PDA08C-00200E manuals
Add to My Manuals
Save this manual to your list of manuals |
Page 23 highlights
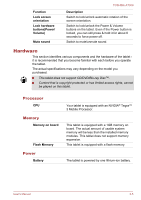
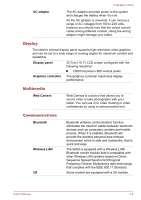
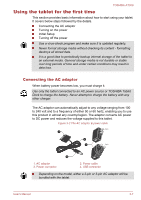
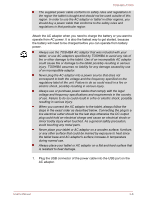
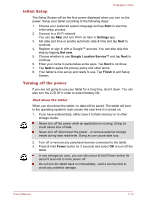
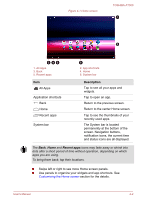
TOSHIBA AT300 Initial Setup The Setup Screen will be the first screen displayed when you turn on the power. Setup your tablet according to the following steps: 1. Choose your preferred system language and tap Start to start the initial setup process. 2. Connect to a Wi-Fi network. You can tap Skip and turn Wi-Fi on later in Settings app. 3. Set date and time or enable automatic date & time and tap Next to continue. 4. Register or sign in with a Google™ account. You can also skip this step by tapping Not now. 5. Choose whether to use Google Location Service™ and tap Next to continue. 6. Enter your name to personalize some apps. Tap Next to continue. 7. Tap Next to agree the privacy policy and other terms. 8. Your tablet is now set up and ready to use. Tap Finish to exit Setup Screen. Turning off the power If you are not going to use your tablet for a long time, shut it down. You can also turn the LCD off in order to extend battery life. Shut down the tablet When you shut down the tablet, no data will be saved. The tablet will boot to the operating system's main screen the next time it is turned on. 1. If you have entered data, either save it to flash memory or to other storage media. Never turn off the power while an application is running. Doing so could cause loss of data. Never turn off /disconnect the power , or remove external storage media during data read/write. Doing so can cause data loss. 2. Turn off or remove any peripheral devices connected to the tablet. 3. Press & hold Power button for 2 seconds and select OK to turn off the tablet. In any emergency case, you can also press & hold Power button for about 6 seconds to force power off. Do not turn the tablet back on immediately - wait a short period to avoid any potential damage. User's Manual 3-10
-
 1
1 -
2
-
3
-
4
-
5
-
6
-
7
-
8
-
9
-
10
-
11
-
12
-
13
-
14
-
15
-
16
-
17
-
 18
18 -
 19
19 -
 20
20 -
 21
21 -
 22
22 -
 23
23 -
 24
24 -
 25
25 -
 26
26 -
 27
27 -
 28
28 -
29
-
30
-
31
-
32
-
33
-
34
-
35
-
36
-
37
-
38
-
39
-
40
-
41
-
42
-
43
-
44
-
45
-
46
-
47
-
48
-
49
-
50
-
51
-
52
-
53
-
54
-
55
-
56
-
57
-
58
-
59
-
60
-
61
-
62
-
63
-
64
-
65
-
66
-
67
-
68
-
69
-
70
-
71
-
72
-
73
-
74
-
75
-
76
-
77
-
78
-
79
-
80
-
81
-
82
-
83
-
84
-
85
-
86
-
87
-
88
 |
 |
