Toshiba HD-A2W Owners Manual - Page 22
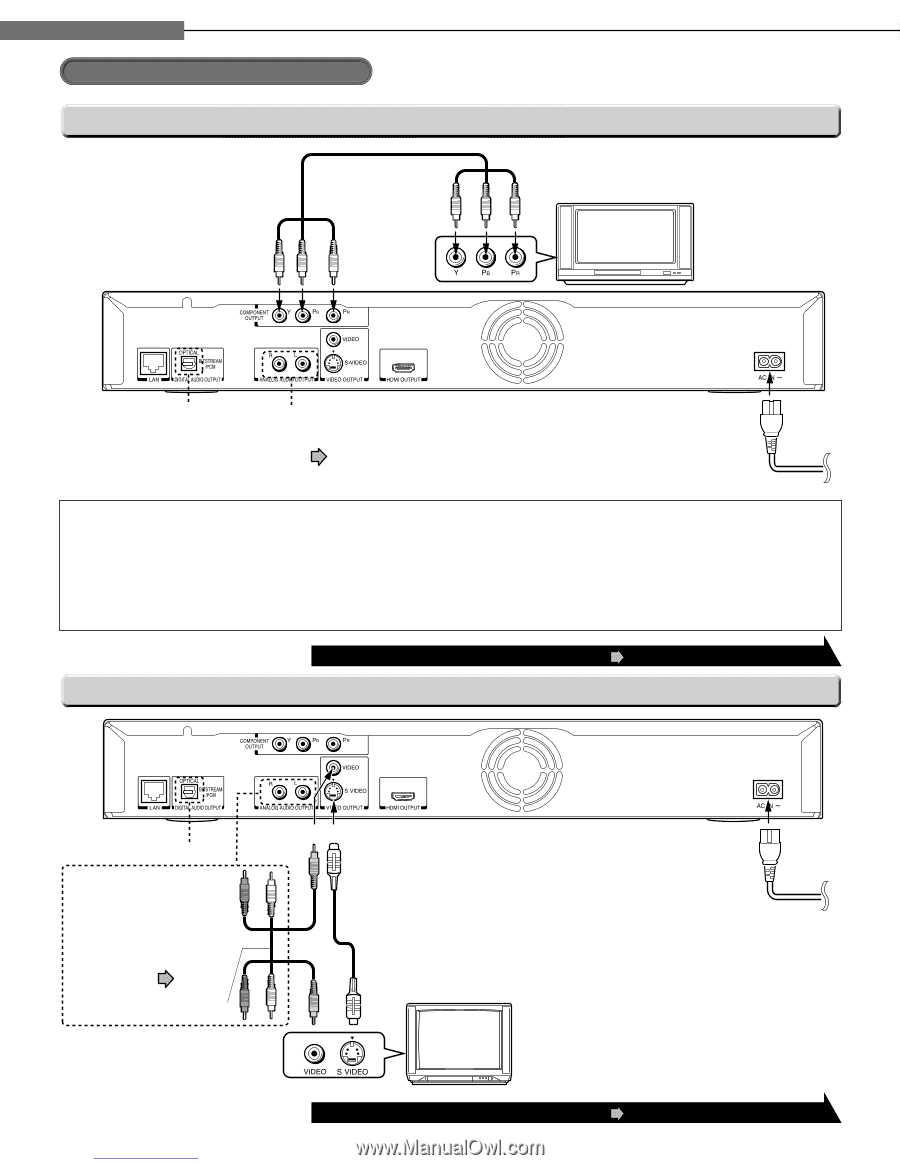
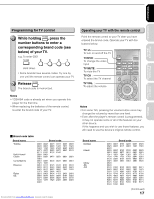
Via component video input, Via S-VIDEO or VIDEO yellow input
 |
View all Toshiba HD-A2W manuals
Add to My Manuals
Save this manual to your list of manuals |
Page 22 highlights
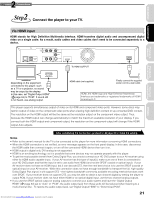
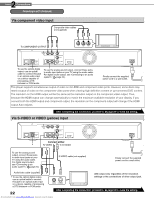
2 Chapter Connections Connecting to an TV (Continued) Via component video input Composite video cables (not supplied) To COMPONENT OUTPUT To use the optical digital output, use an optical cable to connect this jack to an optical audio input on a device capable of processing a DTS bistream or PCM audio. To use the analog sound output, connect these jacks to audio input jacks on your TV using the audio cable. For digital sound output, see "Connecting to an audio system" ( page 24). Finally connect the supplied power cord to a wall outlet. This player supports simultaneous output of video on its HDMI and component video ports. However, some discs may restrict output of video on the component video ports when viewing high definition content or up-converted DVD content. The resolution on the HDMI output will be the same as the resolution output on the component video output. Thus, because the HDMI output can change automatically to match the maximum available resolution of your display, if you connect both the HDMI output and component output, the resolution on the component output will change if the HDMI output Auto-adjusts. After completing the connection, proceed to page 23 to make the setting. Via S-VIDEO or VIDEO (yellow) input Connect either. * To VIDEO To S-VIDEO To use the analog sound output, connect these jacks to audio input jacks on your TV using the audio cable. For digital sound output, see "Connecting to an audio system" ( page 24). S-VIDEO cable (not supplied) Finally connect the supplied power cord to a wall outlet. Audio/video cable (supplied) * To use the optical digital output, use an optical cable to connect this jack to an optical audio input on a device capable of processing a DTS bistream or PCM audio. 22 Downloaded from www.Manualslib.com manuals search engine 480i output only regardless of the resolution settings or the connections of other output jack. After completing the connection, proceed to page 23 to make the setting.
-
 1
1 -
2
-
3
-
4
-
5
-
6
-
7
-
8
-
9
-
10
-
11
-
12
-
13
-
14
-
15
-
16
-
 17
17 -
 18
18 -
 19
19 -
 20
20 -
 21
21 -
 22
22 -
 23
23 -
 24
24 -
 25
25 -
 26
26 -
 27
27 -
28
-
29
-
30
-
31
-
32
-
33
-
34
-
35
-
36
-
37
-
38
-
39
-
40
-
41
-
42
-
43
-
44
-
45
-
46
-
47
-
48
-
49
-
50
-
51
-
52
-
53
-
54
-
55
-
56
-
57
-
58
-
59
-
60
-
61
-
62
-
63
-
64
-
65
-
66
-
67
-
68
-
69
-
70
-
71
-
72
 |
 |