Toshiba HD-A30 Owners Manual - Page 18
Step 5: Powering on, Step 6: Setting up the player
 |
UPC - 022265000908
View all Toshiba HD-A30 manuals
Add to My Manuals
Save this manual to your list of manuals |
Page 18 highlights
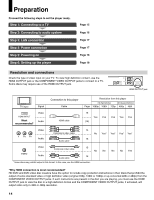
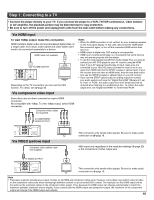
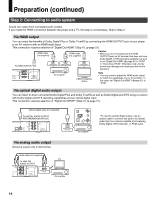
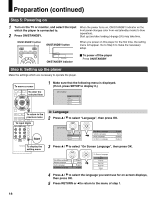
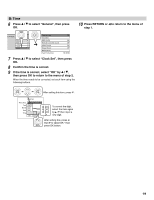
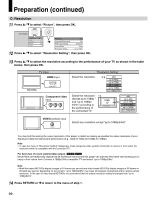
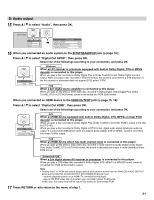
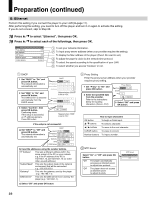
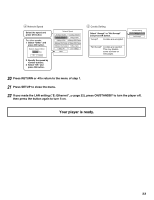
Preparation (continued) Step 5: Powering on 1 Turn on the TV or monitor, and select the input When the power turns on, ON/STANDBY indicator on the which the player is connected to. front panel changes color from red (standby mode) to blue 2 Press ON/STANDBY. (operation). Start up (and disc loading ( page 24)) may take time. ON/STANDBY button ON/STANDBY button When you power on this player for the first time, the setting menu will appear. Go to Step 6 to make the necessary setup. ON/STANDBY indicator To power off the player Press ON/STANDBY. Step 6: Setting up the player Make the settings which are necessary to operate the player. To move a cursor To enter the selected item 1 Make sure that the following menu is displayed. (If not, press SETUP to display it.) SETUP MENU Picture Audio Language Ethernet General To return to the previous menu To input digits Start A: Language 2 Press / to select "Language", then press OK. SETUP MENU Picture Audio Language Ethernet General Disc Menu Language Subtitle Language Audio Language On Screen Language English None English English To display the setting menu 3 Press / to select "On Screen Language", then press OK. Disc Menu Language Subtitle Language Audio Language On Screen Language English None English English On Screen Language English French German Spanish Italian 4 Press / to select the language you want use for on-screen displays, then press OK. 5 Press RETURN or to return to the menu of step 1. 18
-
 1
1 -
2
-
3
-
4
-
5
-
6
-
7
-
8
-
9
-
10
-
11
-
12
-
 13
13 -
 14
14 -
 15
15 -
 16
16 -
 17
17 -
 18
18 -
 19
19 -
 20
20 -
 21
21 -
 22
22 -
 23
23 -
24
-
25
-
26
-
27
-
28
-
29
-
30
-
31
-
32
-
33
-
34
-
35
-
36
-
37
-
38
-
39
-
40
-
41
-
42
-
43
-
44
-
45
-
46
-
47
-
48
 |
 |
