Toshiba HD-A30 Owners Manual - Page 19
B: Time - remote control
 |
UPC - 022265000908
View all Toshiba HD-A30 manuals
Add to My Manuals
Save this manual to your list of manuals |
Page 19 highlights
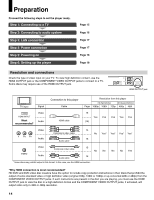
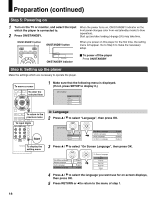
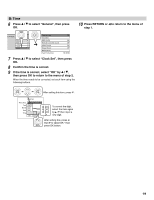
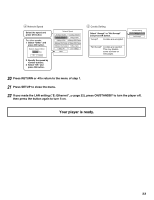
B: Time 6 Press / to select "General", then press OK. 10 Press RETURN or to return to the menu of step 1. ETUP MENU Picture Audio Language Ethernet General Parental Lock Clock Set OSD On/Off Remote Controller Sound HDMI Control Screen Saver Maintenance Twin Format Disc Off Off Off Off Off Off HD DVD 7 Press / to select "Clock Set", then press OK. 8 Confirm the time is correct. 9 If the time is correct, select "OK" by / , then press OK to return to the menu of step 2. When the time needs to be corrected, set each item using the following buttons. After setting this item, press . Clock Set Time Zone (GMT-4:00)Atlantic Time Year 2007 Month 00 Date 00 Time 00 : 00 : 00 AM OK Cancel To correct the digit, select the item again by / then input a new digit. After setting this, press then to select ìOK " then press OK button. 19
-
 1
1 -
2
-
3
-
4
-
5
-
6
-
7
-
8
-
9
-
10
-
11
-
12
-
13
-
 14
14 -
 15
15 -
 16
16 -
 17
17 -
 18
18 -
 19
19 -
 20
20 -
 21
21 -
 22
22 -
 23
23 -
 24
24 -
25
-
26
-
27
-
28
-
29
-
30
-
31
-
32
-
33
-
34
-
35
-
36
-
37
-
38
-
39
-
40
-
41
-
42
-
43
-
44
-
45
-
46
-
47
-
48
 |
 |
