Toshiba M100 User Manual - Page 164
Removing memory module, Control Panel
 |
View all Toshiba M100 manuals
Add to My Manuals
Save this manual to your list of manuals |
Page 164 highlights
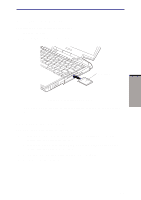
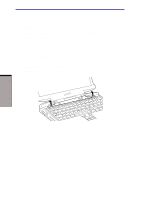
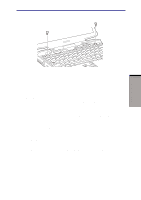
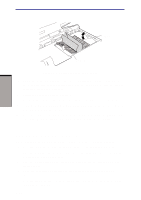
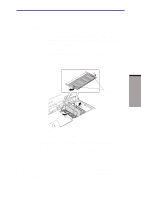
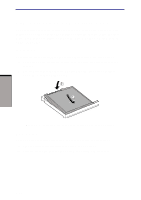
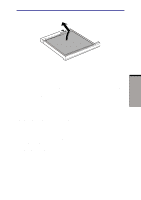
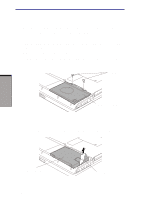
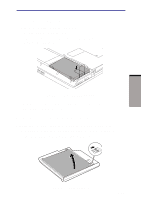
OPTIONAL DEVICES User's Manual SLOT B SLOT A Figure 8-7 Seating the memory module 9. Rotate the keyboard into place. Insert six small tongues on the front edge of the keyboard into corresponding notches on the computer. Be sure the ribbon cable lies flat and is not pinched. 10. Secure the keyboard with two screws. 11. Set the keyboard brace into its groove and press down to secure the latches. 12. Turn the computer upside down and replace the battery pack (refer to Chapter 6, Power and Power-Up Modes.) 13. Turn the computer on and check the memory. Open the System Properties icon in the Windows Control Panel and click the General tab. Removing memory module To remove the memory module, make sure the computer is in boot mode then: 1. Turn the computer off and remove all cables connected to the computer. 2. Turn the computer upside down and remove the battery pack (refer to Chapter 6, Power and Power-Up Modes.) 3. Slide the display latch on the front of the computer to the right and open the display panel. 4. Open the keyboard as described in the previous section and lift out the insulator. 5. Push the latches to the outside to release the module. A spring will force one end of the module up. 8-10
-
 1
1 -
2
-
3
-
4
-
5
-
6
-
7
-
8
-
9
-
10
-
11
-
12
-
13
-
14
-
15
-
16
-
17
-
18
-
19
-
20
-
21
-
22
-
23
-
24
-
25
-
26
-
27
-
28
-
29
-
30
-
31
-
32
-
33
-
34
-
35
-
36
-
37
-
38
-
39
-
40
-
41
-
42
-
43
-
44
-
45
-
46
-
47
-
48
-
49
-
50
-
51
-
52
-
53
-
54
-
55
-
56
-
57
-
58
-
59
-
60
-
61
-
62
-
63
-
64
-
65
-
66
-
67
-
68
-
69
-
70
-
71
-
72
-
73
-
74
-
75
-
76
-
77
-
78
-
79
-
80
-
81
-
82
-
83
-
84
-
85
-
86
-
87
-
88
-
89
-
90
-
91
-
92
-
93
-
94
-
95
-
96
-
97
-
98
-
99
-
100
-
101
-
102
-
103
-
104
-
105
-
106
-
107
-
108
-
109
-
110
-
111
-
112
-
113
-
114
-
115
-
116
-
117
-
118
-
119
-
120
-
121
-
122
-
123
-
124
-
125
-
126
-
127
-
128
-
129
-
130
-
131
-
132
-
133
-
134
-
135
-
136
-
137
-
138
-
139
-
140
-
141
-
142
-
143
-
144
-
145
-
146
-
147
-
148
-
149
-
150
-
151
-
152
-
153
-
154
-
155
-
156
-
157
-
158
-
 159
159 -
 160
160 -
 161
161 -
 162
162 -
 163
163 -
 164
164 -
 165
165 -
 166
166 -
 167
167 -
 168
168 -
 169
169 -
170
-
171
-
172
-
173
-
174
-
175
-
176
-
177
-
178
-
179
-
180
-
181
-
182
-
183
-
184
-
185
-
186
-
187
-
188
-
189
-
190
-
191
-
192
-
193
-
194
-
195
-
196
-
197
-
198
-
199
-
200
-
201
-
202
-
203
-
204
-
205
-
206
-
207
-
208
-
209
-
210
-
211
-
212
-
213
-
214
-
215
-
216
-
217
-
218
-
219
-
220
-
221
-
222
-
223
-
224
-
225
-
226
-
227
-
228
-
229
-
230
-
231
-
232
-
233
-
234
-
235
-
236
-
237
-
238
-
239
-
240
-
241
-
242
-
243
-
244
-
245
-
246
-
247
-
248
-
249
-
250
-
251
-
252
-
253
-
254
-
255
-
256
-
257
-
258
-
259
-
260
-
261
-
262
-
263
-
264
-
265
-
266
-
267
-
268
-
269
-
270
-
271
-
272
 |
 |
