Toshiba MES60V Service Manual - Page 14
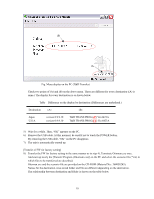
Menu display on the PC T&D Transfer
 |
View all Toshiba MES60V manuals
Add to My Manuals
Save this manual to your list of manuals |
Page 14 highlights
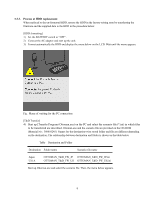
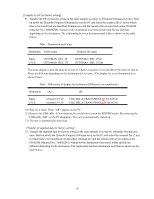
(B) (A) Fig. Menu display on the PC (T&D Transfer) Check two points of (A) and (B) on the above menu. These are different for every destination ((A) is same.) The display for every destination is as shown below. Table Difference on the display by destination (Differences are underlined.) Destination (A) Japan U.S.A. version 0.9.9.10 version 0.9.9.10 (B) T&D TRANS PROG(JP) Ver.6423A T&D TRANS PROG(US) Ver.6423A 5) Wait for a while. Then, "OK" appears on the PC. 6) Remove the USB cable. At this moment, be careful not to touch the POWER button. By removing the USB cable, "OK" on the PC disappears. 7) The unit is automatically started up. [Transfer of FW for factory setting] 8) Transfer the FW for factory setting in the same manner as in step 4). Terminate Ottoman.exe once. And start up newly the [Transfer Program (Ottomam.exe)] on the PC and select the scenario file (*.ini) in which files to be transferred are described. Ottoman.exe and the scenario file are provided on the CD-ROM (Material No.: 360058245). Names for the destination-wise stored folder and file are different depending on the destination. The relationship between destination and folder is shown on the table below. 10
-
 1
1 -
2
-
3
-
4
-
5
-
6
-
7
-
8
-
 9
9 -
 10
10 -
 11
11 -
 12
12 -
 13
13 -
 14
14 -
 15
15 -
 16
16 -
 17
17 -
 18
18 -
 19
19 -
20
-
21
-
22
-
23
-
24
-
25
-
26
-
27
-
28
-
29
-
30
-
31
-
32
-
33
-
34
-
35
-
36
-
37
-
38
-
39
-
40
-
41
-
42
-
43
 |
 |
