Toshiba MES60V Service Manual - Page 32
the flathead screwdriver
 |
View all Toshiba MES60V manuals
Add to My Manuals
Save this manual to your list of manuals |
Page 32 highlights
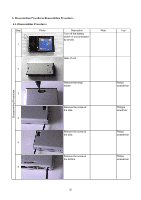
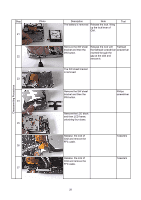
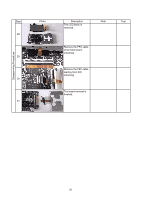
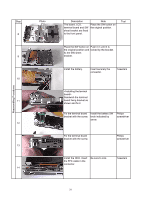
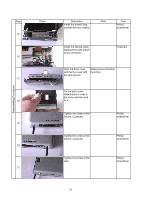
Disassemnling Procedures Step 21 22 23 24 25 26 27 Photo Description Note Tool The battery is removed. Release the lock, lifting up the lock lever of CN1. Remove the SW sheet bracket and then the SW button. Release the lock with Flathead the flathead screwdriver screwdriver inserted through the gap at the side and remove it. The SW sheet bracket is removed. Remove the SW sheet bracket and then the SW button. Remove the LCD block and then LCD frame, unlocking four claws. Release the lock of CN2 and remove the FFC cable. Release the lock of CN4 and remove the FFC cable. Philips screwdriver Tweezers Tweezers 28
-
 1
1 -
2
-
3
-
4
-
5
-
6
-
7
-
8
-
9
-
10
-
11
-
12
-
13
-
14
-
15
-
16
-
17
-
18
-
19
-
20
-
21
-
22
-
23
-
24
-
25
-
26
-
 27
27 -
 28
28 -
 29
29 -
 30
30 -
 31
31 -
 32
32 -
 33
33 -
 34
34 -
 35
35 -
 36
36 -
 37
37 -
38
-
39
-
40
-
41
-
42
-
43
 |
 |

Step
Tool
23
22
21
27
26
25
24
Disassemnling Procedures
Photo
Description
Note
The battery is removed.
Release the lock, lifting
up the lock lever of
CN1.
The SW sheet bracket
is removed.
Remove the LCD block
and then LCD frame,
unlocking four claws.
Remove the SW sheet
bracket and then the
SW button.
Release the lock with
the flathead screwdriver
inserted through the
gap at the side and
remove it.
Flathead
screwdriver
Remove the SW sheet
bracket and then the
SW button.
Philips
screwdriver
Release
the lock of
CN4 and remove the
FFC cable.
Tweezers
Release
the lock of
CN2 and remove the
FFC cable.
Tweezers
28