Toshiba MES60V Service Manual - Page 31
Remove the HDD
 |
View all Toshiba MES60V manuals
Add to My Manuals
Save this manual to your list of manuals |
Page 31 highlights
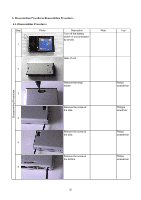
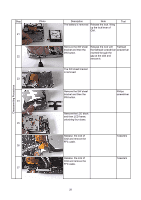
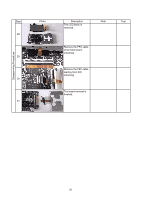
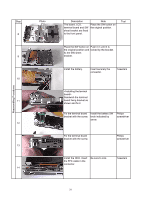
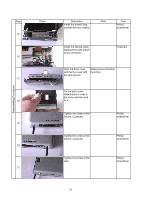
Disassemnling Procedures Step 14 15 16 17 18 19 20 Photo Description Note Tool The board fixing bracket bracket 1 piece, screw is removed. 2 pieces Remove the HDD flexible cable. Release the lock, lifting Tweezers the connector lock upward. The HDD is removed. Remove the terminal board. Remove the screw at the bottom. The terminal board is Philips fixed with the fixing screwdriver bracket and two screws. Remove the terminal board. Remove the screw at the side. Philips screwdriver Slide in the arrow direction and remove the board, lifting up. Remove the battery connector and battery. 27
-
 1
1 -
2
-
3
-
4
-
5
-
6
-
7
-
8
-
9
-
10
-
11
-
12
-
13
-
14
-
15
-
16
-
17
-
18
-
19
-
20
-
21
-
22
-
23
-
24
-
25
-
 26
26 -
 27
27 -
 28
28 -
 29
29 -
 30
30 -
 31
31 -
 32
32 -
 33
33 -
 34
34 -
 35
35 -
 36
36 -
37
-
38
-
39
-
40
-
41
-
42
-
43
 |
 |

Step
Tool
Disassemnling Procedures
Photo
Description
Note
The board fixing bracket
is removed.
bracket 1 piece, screw
2 pieces
The HDD is removed.
Remove the terminal
board. Remove the
screw at the side.
Remove the HDD
flexible cable.
Release the lock, lifting
the connector lock
upward.
Tweezers
Remove the terminal
board. Remove the
screw at the bottom.
The terminal board is
fixed with the fixing
bracket and two screws.
Philips
screwdriver
Remove the battery
connector and battery.
Philips
screwdriver
Slide in the arrow
direction and remove
the board, lifting up.
14
20
19
18
15
16
17
27