Toshiba MES60V Service Manual - Page 35
Install the HDD. Insert
 |
View all Toshiba MES60V manuals
Add to My Manuals
Save this manual to your list of manuals |
Page 35 highlights
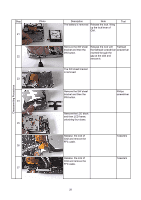
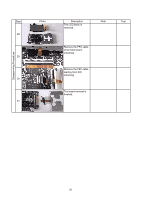
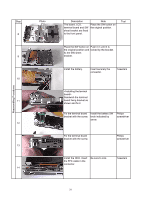
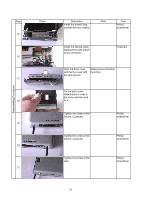
Reassembling Procedures Step 8 9 10 11 12 13 14 Photo Description Note Tool The board, LCD, Place the SW button on terminal board and SW the original position. sheet bracket are fixed to the front panel. Place the SW button on Push it in until it is the original position and locked by the bracket. fix the SW sheet bracket. Install the battery. Insert securely the connector. Tweezers Sandwich the terminal board fixing bracket as shown and fix it. Fix the terminal board Install the battery SW bracket with the screw. knob indicated by arrow. Philips screwdriver Fix the terminal board bracket with the screw. Philips screwdriver Install the HDD. Insert the FFC cable in the connector. Be sure to lock. Tweezers 31
-
 1
1 -
2
-
3
-
4
-
5
-
6
-
7
-
8
-
9
-
10
-
11
-
12
-
13
-
14
-
15
-
16
-
17
-
18
-
19
-
20
-
21
-
22
-
23
-
24
-
25
-
26
-
27
-
28
-
29
-
 30
30 -
 31
31 -
 32
32 -
 33
33 -
 34
34 -
 35
35 -
 36
36 -
 37
37 -
 38
38 -
 39
39 -
 40
40 -
41
-
42
-
43
 |
 |
Step
Tool
Reassembling Procedures
8
9
10
13
12
11
14
Place the SW button on
the original position and
fix the SW sheet
bracket.
Push it in until it is
locked by the bracket.
The board, LCD,
terminal board and SW
sheet bracket are fixed
to the front panel.
Place the SW button on
the original position.
Philips
screwdriver
Philips
screwdriver
Tweezers
Install the HDD. Insert
the FFC cable in the
connector.
Be sure to lock.
Install the battery SW
knob indicated by
arrow.
Fix the terminal board
bracket with the screw.
Fix the terminal board
bracket with the screw.
Photo
Description
Note
<Installing the teminal
board>
Sandwich the terminal
board fixing bracket as
shown and fix it.
Install the battery.
Insert securely the
connector.
Tweezers
31