Toshiba PA5022U-1LC3 User's Guide for PA5022U-1LC3 USB Monitor - Page 11
Installing the video driver, Connecting the monitor to your computer, Install Driver - driver download
 |
View all Toshiba PA5022U-1LC3 manuals
Add to My Manuals
Save this manual to your list of manuals |
Page 11 highlights
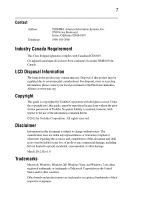
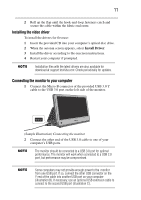
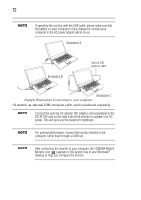
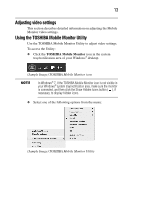
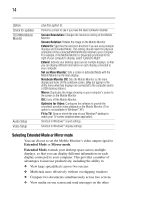
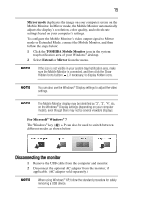
11 2 Roll up the flap until the hook-and-loop fasteners catch and secure the cable within the fabric enclosure. Installing the video driver To install the drivers for first use: 1 Insert the provided CD into your computer's optical disc drive. 2 When the autorun screen appears, select Install Driver. 3 Install the driver according to the onscreen instructions. 4 Restart your computer if prompted. Installation files with the latest drivers are also available for download at support.toshiba.com. Check periodically for updates. Connecting the monitor to your computer 1 Connect the Micro-B connector of the provided USB 3.0 Y cable to the USB 3.0 port on the left side of the monitor. (Sample Illustration) Connecting the monitor 2 Connect the other end of the USB 3.0 cable to one of your computer's USB ports. The monitor should be connected to a USB 3.0 port for optimal performance. The monitor will work when connected to a USB 2.0 port, but performance may be compromised. Some computers may not provide enough power to the monitor from one USB port. If so, connect the other USB connector on the Y end of the cable into another USB port on your computer (illustration B). If necessary, use an optional USB extension cable to connect to the second USB port (illustration C).
-
 1
1 -
2
-
3
-
4
-
5
-
 6
6 -
 7
7 -
 8
8 -
 9
9 -
 10
10 -
 11
11 -
 12
12 -
 13
13 -
 14
14 -
 15
15 -
 16
16 -
17
-
18
-
19
-
20
-
21
-
22
-
23
-
24
-
25
-
26
-
27
-
28
-
29
-
30
-
31
-
32
-
33
-
34
-
35
-
36
-
37
-
38
-
39
-
40
-
41
-
42
 |
 |