Toshiba Portege M750 PPM75A-09U010 Users Manual AU/NZ - Page 86
Installing a memory module Slot B, Power and Power-Up Modes, for details.
 |
View all Toshiba Portege M750 PPM75A-09U010 manuals
Add to My Manuals
Save this manual to your list of manuals |
Page 86 highlights
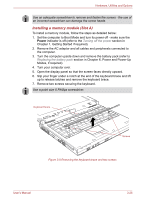
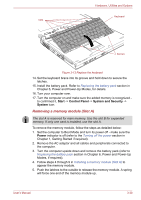
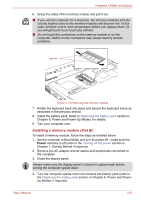
Hardware, Utilities and Options 6. Grasp the sides of the memory module and pull it out. ■ If you use the computer for a long time, the memory modules and the circuits located close to the memory modules will become hot. In this case, let them cool to room temperature before you replace them. Or you will get burnt if you touch any of them. ■ Do not touch the connectors on the memory module or on the computer. Debris on the connectors may cause memory access problems. Latches Figure 3-14 Removing the memory module 7. Rotate the keyboard back into place and secure the keyboard brace as described in the previous section. 8. Install the battery pack. Refer to Replacing the battery pack section in Chapter 6, Power and Power-Up Modes, for details. 9. Turn your computer over. Installing a memory module (Slot B) To install a memory module, follow the steps as detailed below: 1. Set the computer to Boot Mode and turn its power off - make sure the Power indicator is off (refer to the Turning off the power section in Chapter 1, Getting Started if required). 2. Remove the AC adaptor and all cables and peripherals connected to the computer. 3. Close the display panel. Always make sure the display panel is closed in Laptop mode before turning the computer upside down. 4. Turn the computer upside down and remove the battery pack (refer to the Replacing the battery pack section in Chapter 6, Power and PowerUp Modes, if required). User's Manual 3-31
-
 1
1 -
2
-
3
-
4
-
5
-
6
-
7
-
8
-
9
-
10
-
11
-
12
-
13
-
14
-
15
-
16
-
17
-
18
-
19
-
20
-
21
-
22
-
23
-
24
-
25
-
26
-
27
-
28
-
29
-
30
-
31
-
32
-
33
-
34
-
35
-
36
-
37
-
38
-
39
-
40
-
41
-
42
-
43
-
44
-
45
-
46
-
47
-
48
-
49
-
50
-
51
-
52
-
53
-
54
-
55
-
56
-
57
-
58
-
59
-
60
-
61
-
62
-
63
-
64
-
65
-
66
-
67
-
68
-
69
-
70
-
71
-
72
-
73
-
74
-
75
-
76
-
77
-
78
-
79
-
80
-
 81
81 -
 82
82 -
 83
83 -
 84
84 -
 85
85 -
 86
86 -
 87
87 -
 88
88 -
 89
89 -
 90
90 -
 91
91 -
92
-
93
-
94
-
95
-
96
-
97
-
98
-
99
-
100
-
101
-
102
-
103
-
104
-
105
-
106
-
107
-
108
-
109
-
110
-
111
-
112
-
113
-
114
-
115
-
116
-
117
-
118
-
119
-
120
-
121
-
122
-
123
-
124
-
125
-
126
-
127
-
128
-
129
-
130
-
131
-
132
-
133
-
134
-
135
-
136
-
137
-
138
-
139
-
140
-
141
-
142
-
143
-
144
-
145
-
146
-
147
-
148
-
149
-
150
-
151
-
152
-
153
-
154
-
155
-
156
-
157
-
158
-
159
-
160
-
161
-
162
-
163
-
164
-
165
-
166
-
167
-
168
-
169
-
170
-
171
-
172
-
173
-
174
-
175
-
176
-
177
-
178
-
179
-
180
-
181
-
182
-
183
-
184
-
185
-
186
-
187
-
188
-
189
-
190
-
191
-
192
-
193
-
194
-
195
-
196
-
197
-
198
-
199
-
200
-
201
-
202
-
203
-
204
-
205
-
206
-
207
-
208
-
209
-
210
-
211
-
212
-
213
-
214
-
215
-
216
-
217
-
218
-
219
-
220
-
221
-
222
-
223
-
224
-
225
-
226
-
227
-
228
-
229
-
230
-
231
-
232
-
233
-
234
-
235
-
236
-
237
-
238
-
239
-
240
-
241
-
242
-
243
-
244
-
245
-
246
-
247
-
248
-
249
-
250
-
251
-
252
-
253
-
254
-
255
-
256
-
257
-
258
-
259
-
260
-
261
-
262
-
263
-
264
-
265
-
266
-
267
-
268
-
269
 |
 |
