Toshiba Qosmio X870 PSPLXC-02600F Users Manual Canada; English - Page 84
Removing a memory media, Additional memory module, Safely Remove Hardware and Eject Media
 |
View all Toshiba Qosmio X870 PSPLXC-02600F manuals
Add to My Manuals
Save this manual to your list of manuals |
Page 84 highlights
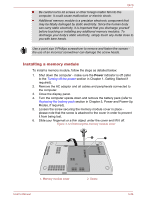
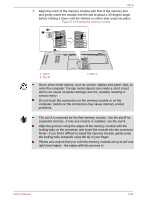
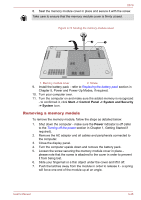
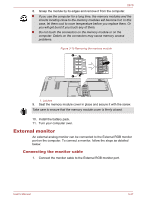
X870 Do not turn the computer off or switch to Sleep Mode or Hibernation Mode while files are being copied - doing so may cause data to be lost. Removing a memory media The following instructions apply to all types of supported media devices. To remove a memory media, follow the steps as detailed below: 1. Open the Safely Remove Hardware and Eject Media icon on the Windows Taskbar. 2. Point to memory media and click the left Touch Pad control button. 3. Push the memory media until you hear a click to partially release it. 4. Grasp it and pull it out of the slot. Do not remove the memory media while the computer is in Sleep or Hibernation Mode. The computer could become unstable or data in the memory media could be lost. Do not remove only the miniSD/microSD Card while leaving the adaptor in the Memory media slot. Additional memory module You can install additional memory into the computer in order to increase the amount of system memory that is available. This section describes how to install and remove optional memory modules. You should place a mat beneath the computer in order to prevent the computer's lid from becoming scratched or damaged when you are installing/replacing the memory module. In this instance you should avoid mats that are made of materials that hold or generate static electricity. When installing or removing a memory module, you must ensure that you do not touch any other internal areas of the computer. Use only memory modules approved by TOSHIBA. Do not try to install or remove a memory module under the following conditions. a. The computer is turned on. b. The computer was shut down in either Sleep or Hibernation Mode. c. Wake-up on LAN is enabled. d. The wireless communication function is on. e. Sleep and Charge function is enabled. User's Manual 3-43
-
 1
1 -
2
-
3
-
4
-
5
-
6
-
7
-
8
-
9
-
10
-
11
-
12
-
13
-
14
-
15
-
16
-
17
-
18
-
19
-
20
-
21
-
22
-
23
-
24
-
25
-
26
-
27
-
28
-
29
-
30
-
31
-
32
-
33
-
34
-
35
-
36
-
37
-
38
-
39
-
40
-
41
-
42
-
43
-
44
-
45
-
46
-
47
-
48
-
49
-
50
-
51
-
52
-
53
-
54
-
55
-
56
-
57
-
58
-
59
-
60
-
61
-
62
-
63
-
64
-
65
-
66
-
67
-
68
-
69
-
70
-
71
-
72
-
73
-
74
-
75
-
76
-
77
-
78
-
 79
79 -
 80
80 -
 81
81 -
 82
82 -
 83
83 -
 84
84 -
 85
85 -
 86
86 -
 87
87 -
 88
88 -
 89
89 -
90
-
91
-
92
-
93
-
94
-
95
-
96
-
97
-
98
-
99
-
100
-
101
-
102
-
103
-
104
-
105
-
106
-
107
-
108
-
109
-
110
-
111
-
112
-
113
-
114
-
115
-
116
-
117
-
118
-
119
-
120
-
121
-
122
-
123
-
124
-
125
-
126
-
127
-
128
-
129
-
130
-
131
-
132
-
133
-
134
-
135
-
136
-
137
-
138
-
139
-
140
-
141
-
142
-
143
-
144
-
145
-
146
-
147
-
148
-
149
-
150
-
151
-
152
-
153
-
154
-
155
-
156
-
157
-
158
-
159
-
160
-
161
-
162
-
163
-
164
 |
 |
