Toshiba SD-V290 Owners Manual - Page 24
Timer Recording, Things to know before starting
 |
View all Toshiba SD-V290 manuals
Add to My Manuals
Save this manual to your list of manuals |
Page 24 highlights
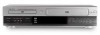
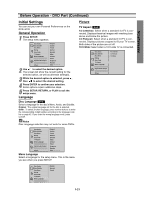
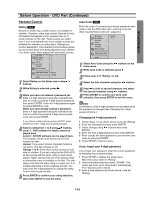
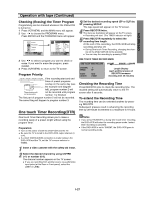
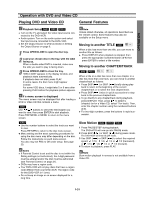
Operation with tape (Continued) Timer Recording This DVD+VCR can be programmed to record up to 8 programs within a period of 1 year. For unattended recording, the timer needs to know the channels to be recorded and the starting and ending times. Things to know before starting z If you try to set the program timer before setting the clock, PLEASE SET THE CLOCK appears for a moment and then CLOCK menu appears on the TV screen. Set the time and date before proceeding. z Make sure a tape is in the DVD+VCR and the safety tab is in place or the tape will be automatically ejected. Preparation: z Turn on the power of both the DVD+VCR and the TV. z Be sure the TV is set to the DVD+VCR output channel (3 or 4). z Make sure the TUNING BAND in the TUNING menu is set appropriately (TV or CATV). 1 Press VCR MENU and the MAIN menu will appear. 2 Use v/V to choose the PROGRAM menu. 3 Press ENTER to go to the PROGRAM menu. The PROGRAM menu will appear. z If all programs have already been entered, FULLY PROGRAMMED message will appear for a moment and then PROGRAM 1 will appear on the TV screen. 4 Use b/B to choose the PROGRAM No. (1-8). 5 Use V to choose the MONTH option. Use b/B to choose the desired month. 6 Use V to choose the DAY option. Use b/B to choose the desired day. 7 Use V to choose the START option. Use b/B to choose the desired start time. Press and hold b/B to advance the clock faster. 8 Use V to choose the STOP option. Use b/B to choose the desired stop time. Press and hold b/B to advance the clock faster. 9 Use V to choose the CHANNEL option. Use b/B to choose the desired channel (Channel, LINE1 or LINE2). Cable Users: If you have CABLE TV and used Cable Box in Connecting Antenna/Cable TV to DVD+VCR (page 11), using a cable box converter, you must set the channel in this step to match the cable box output channel (usually CH 3 or 4). Change channels on the cable box instead of with the DVD+VCR. 10 11 Use V to choose the SPEED option. Use b/B to choose the desired recording speed (AUTO, SP or SLP). z AUTO mode determines how much tape is left and switches speed from SP to SLP, if necessary, to complete recording the program. There will be some picture and sound distortion at the point of the speed change. Use V to choose the REPEAT option. Use b/B to choose the desired repeat (ONCE, WEEKLY or DAILY). ONCE event....for recording up to 8 programs on a single day or over the days within a period of 1 year. WEEKLY event....for recording up to 8 programs on a certain day of every week. DAILY event....for recording up to 8 programs at the same time(s) Monday through Friday. Tip If the input data is wrong, use v to select the data and correct it using b/B. 12 Press VCR MENU, the program will be memorized at the DVD+VCR. z TIMER indicator lights in the display window. z If the program preset time is past, the PAST TIME PROGRAMMED message will appear on the TV screen. Return to the incorrect program and program it with the correct time. z If you had entered a past date, the timer recording will be performed on that date of the next year. z Additional programs may be entered by repeating steps 1-12. Cable Users: If your cable hookup is via a TV converter box, you can program multiple recordings only on the converter box output channel. This is because the converter determines what channel you view through your DVD+VCR. Tip If you have finished programming and you want to set the DVD+VCR to record the programs you have entered. MAKE SURE YOU HAVE INSERTED A TAPE INTO THE DVD+VCR. The DVD+VCR is now set to record the preset programs. Note If the power fails or the DVD+VCR is unplugged from the AC outlet, the correct clock time and timer settings are kept in memory for approximately 3 seconds. After 3 seconds, the clock and program timer must be reset when power is restored. Reset the clock according to instructions. After setting a timer recording, it will start if a timer recording passes over the start time when stopping the playback or recording. 1-26
-
 1
1 -
2
-
3
-
4
-
5
-
6
-
7
-
8
-
9
-
10
-
11
-
12
-
13
-
14
-
15
-
16
-
17
-
18
-
 19
19 -
 20
20 -
 21
21 -
 22
22 -
 23
23 -
 24
24 -
 25
25 -
 26
26 -
 27
27 -
 28
28 -
 29
29 -
30
-
31
-
32
-
33
-
34
-
35
-
36
-
37
-
38
-
39
-
40
-
41
-
42
-
43
-
44
-
45
-
46
 |
 |