Toshiba Satellite A205-S4787 Toshiba Online User's Guide for Satellite A200/A2 - Page 153
Booting from a bootable SD card, Mouse Utility
 |
View all Toshiba Satellite A205-S4787 manuals
Add to My Manuals
Save this manual to your list of manuals |
Page 153 highlights
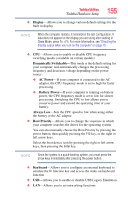
Toshiba Utilities Mouse Utility 153 Booting from a bootable SD card To boot from a bootable SD card: 1 Create a bootable SD card (see "TOSHIBA SD™ Memory Boot Utility" on page 152 for instructions). 2 Verify that no floppy disk is installed in the optional external floppy disk drive. 3 Insert a bootable SD card into the SD card slot. 4 Power on the computer. 5 During the boot process, press the F12 key. The system displays the Boot menu. 6 Use the arrow keys to select the SD/Floppy icon. 7 Press the Enter key. Mouse Utility The Mouse utility allows you to change your pointing device or mouse settings. To access the Mouse utility: 1 Click Start, Control Panel, and then Mouse under Hardware and Sound, or click the Mouse icon in the Optimize tab of TOSHIBA Assist. The Mouse Properties screen appears. (Sample Image) Mouse Properties screen
-
 1
1 -
2
-
3
-
4
-
5
-
6
-
7
-
8
-
9
-
10
-
11
-
12
-
13
-
14
-
15
-
16
-
17
-
18
-
19
-
20
-
21
-
22
-
23
-
24
-
25
-
26
-
27
-
28
-
29
-
30
-
31
-
32
-
33
-
34
-
35
-
36
-
37
-
38
-
39
-
40
-
41
-
42
-
43
-
44
-
45
-
46
-
47
-
48
-
49
-
50
-
51
-
52
-
53
-
54
-
55
-
56
-
57
-
58
-
59
-
60
-
61
-
62
-
63
-
64
-
65
-
66
-
67
-
68
-
69
-
70
-
71
-
72
-
73
-
74
-
75
-
76
-
77
-
78
-
79
-
80
-
81
-
82
-
83
-
84
-
85
-
86
-
87
-
88
-
89
-
90
-
91
-
92
-
93
-
94
-
95
-
96
-
97
-
98
-
99
-
100
-
101
-
102
-
103
-
104
-
105
-
106
-
107
-
108
-
109
-
110
-
111
-
112
-
113
-
114
-
115
-
116
-
117
-
118
-
119
-
120
-
121
-
122
-
123
-
124
-
125
-
126
-
127
-
128
-
129
-
130
-
131
-
132
-
133
-
134
-
135
-
136
-
137
-
138
-
139
-
140
-
141
-
142
-
143
-
144
-
145
-
146
-
147
-
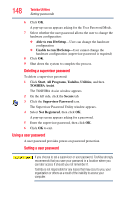 148
148 -
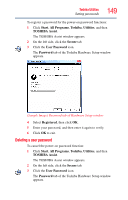 149
149 -
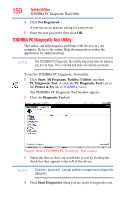 150
150 -
 151
151 -
 152
152 -
 153
153 -
 154
154 -
 155
155 -
 156
156 -
 157
157 -
 158
158 -
159
-
160
-
161
-
162
-
163
-
164
-
165
-
166
-
167
-
168
-
169
-
170
-
171
-
172
-
173
-
174
-
175
-
176
-
177
-
178
-
179
-
180
-
181
-
182
-
183
-
184
-
185
-
186
-
187
-
188
-
189
-
190
-
191
-
192
-
193
-
194
-
195
-
196
-
197
-
198
-
199
-
200
-
201
-
202
-
203
-
204
-
205
-
206
-
207
-
208
-
209
-
210
-
211
-
212
-
213
-
214
-
215
-
216
-
217
-
218
-
219
-
220
-
221
-
222
-
223
-
224
-
225
-
226
-
227
-
228
-
229
-
230
-
231
-
232
-
233
-
234
-
235
-
236
-
237
-
238
-
239
-
240
-
241
-
242
-
243
-
244
 |
 |
