Toshiba Satellite A205-S4787 Toshiba Online User's Guide for Satellite A200/A2 - Page 70
Directing the display output when you turn on the computer, Sample Image Display options window
 |
View all Toshiba Satellite A205-S4787 manuals
Add to My Manuals
Save this manual to your list of manuals |
Page 70 highlights
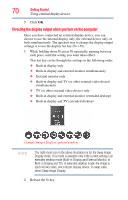
70 Getting Started Using external display devices 5 Click OK. Directing the display output when you turn on the computer Once you have connected an external display device, you can choose to use the internal display only, the external device only, or both simultaneously. The quickest way to change the display output settings is to use the display hot key (Fn + F5): 1 While holding down Fn, press F5 repeatedly, pausing between each press, until the setting you want takes effect. This hot key cycles through the settings in the following order: ❖ Built-in display only ❖ Built-in display and external monitor simultaneously ❖ External monitor only ❖ Built-in display and TV (or other external video device) simultaneously ❖ TV (or other external video device) only ❖ Built-in display and external monitor (extended desktop) ❖ Built-in display and TV (extended desktop) (Sample Image) Display options window NOTE The right-most icon in the above illustration is for the Swap Image Display mode. This mode is available only if the current setting is an extended desktop mode (Built-in Display and External Monitor, or Built-in Display and TV). In extended desktop mode, the image is split into two sides, one side per display device. To swap sides, select Swap Image Display. 2 Release the Fn key.
-
 1
1 -
2
-
3
-
4
-
5
-
6
-
7
-
8
-
9
-
10
-
11
-
12
-
13
-
14
-
15
-
16
-
17
-
18
-
19
-
20
-
21
-
22
-
23
-
24
-
25
-
26
-
27
-
28
-
29
-
30
-
31
-
32
-
33
-
34
-
35
-
36
-
37
-
38
-
39
-
40
-
41
-
42
-
43
-
44
-
45
-
46
-
47
-
48
-
49
-
50
-
51
-
52
-
53
-
54
-
55
-
56
-
57
-
58
-
59
-
60
-
61
-
62
-
63
-
64
-
 65
65 -
 66
66 -
 67
67 -
 68
68 -
 69
69 -
 70
70 -
 71
71 -
 72
72 -
 73
73 -
 74
74 -
 75
75 -
76
-
77
-
78
-
79
-
80
-
81
-
82
-
83
-
84
-
85
-
86
-
87
-
88
-
89
-
90
-
91
-
92
-
93
-
94
-
95
-
96
-
97
-
98
-
99
-
100
-
101
-
102
-
103
-
104
-
105
-
106
-
107
-
108
-
109
-
110
-
111
-
112
-
113
-
114
-
115
-
116
-
117
-
118
-
119
-
120
-
121
-
122
-
123
-
124
-
125
-
126
-
127
-
128
-
129
-
130
-
131
-
132
-
133
-
134
-
135
-
136
-
137
-
138
-
139
-
140
-
141
-
142
-
143
-
144
-
145
-
146
-
147
-
148
-
149
-
150
-
151
-
152
-
153
-
154
-
155
-
156
-
157
-
158
-
159
-
160
-
161
-
162
-
163
-
164
-
165
-
166
-
167
-
168
-
169
-
170
-
171
-
172
-
173
-
174
-
175
-
176
-
177
-
178
-
179
-
180
-
181
-
182
-
183
-
184
-
185
-
186
-
187
-
188
-
189
-
190
-
191
-
192
-
193
-
194
-
195
-
196
-
197
-
198
-
199
-
200
-
201
-
202
-
203
-
204
-
205
-
206
-
207
-
208
-
209
-
210
-
211
-
212
-
213
-
214
-
215
-
216
-
217
-
218
-
219
-
220
-
221
-
222
-
223
-
224
-
225
-
226
-
227
-
228
-
229
-
230
-
231
-
232
-
233
-
234
-
235
-
236
-
237
-
238
-
239
-
240
-
241
-
242
-
243
-
244
 |
 |
