Toshiba Satellite A500 PSAM3C Users Manual Canada; English - Page 131
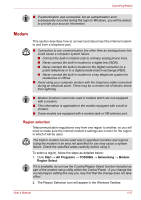
Using TOSHIBA Face Recognition, Open Capture Settings dialog box.
 |
View all Toshiba Satellite A500 PSAM3C manuals
Add to My Manuals
Save this manual to your list of manuals |
Page 131 highlights
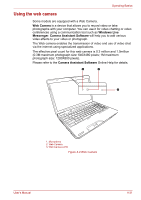
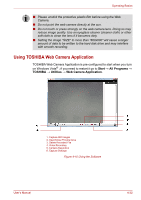
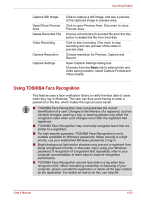
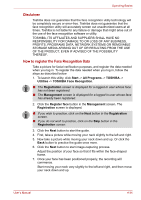
Operating Basics Capture Still Image Open/Close Preview Area Delete Recorded File Video Recording Camera Resolution Capture Settings Click to capture a still image, and see a preview of the captured image in preview area. Click to open Preview Area. One more to close Preview Area. Choose a thumbnail of recorded file and click this button to delete this file from hard disk. Click to start recording. One more to stop recording and see preview of the video in preview area. Choose resolution for Preview, Capture and Record. Open Capture Settings dialog box. Chooses from the Basic tab to select photo and video saving location, select Capture Format and Video Quality. Using TOSHIBA Face Recognition This feature uses a face verification library to verify the face data of users when they log in Windows. The user can thus avoid having to enter a password or the like, which makes the login process easier. ■ TOSHIBA Face Recognition does not guarantee the correct identification of a user. Changes to the likeness of a registrant, such as hairstyle changes, wearing a cap, or wearing glasses may affect the recognition rates when such changes occur after the registrant had registered. ■ TOSHIBA Face Recognition may incorrectly recognize faces that are similar to a registrant. ■ For high security purposes, TOSHIBA Face Recognition is not a suitable substitute for Windows passwords. When security is a high priority, use your established Windows passwords to log in. ■ Bright background light and/or shadows may prevent a registrant from being recognized correctly. In that case, log in using your Windows password. If recognition of a registrant fails repeatedly, refer to your computer documentation to learn ways to improve recognition performance. ■ TOSHIBA Face Recognition records face data in a log when face recognition fails. When transferring ownership or disposing of your computer, please uninstall the application or delete all the logs created by the application. For details on how to do this, see help file. User's Manual 4-33
-
 1
1 -
2
-
3
-
4
-
5
-
6
-
7
-
8
-
9
-
10
-
11
-
12
-
13
-
14
-
15
-
16
-
17
-
18
-
19
-
20
-
21
-
22
-
23
-
24
-
25
-
26
-
27
-
28
-
29
-
30
-
31
-
32
-
33
-
34
-
35
-
36
-
37
-
38
-
39
-
40
-
41
-
42
-
43
-
44
-
45
-
46
-
47
-
48
-
49
-
50
-
51
-
52
-
53
-
54
-
55
-
56
-
57
-
58
-
59
-
60
-
61
-
62
-
63
-
64
-
65
-
66
-
67
-
68
-
69
-
70
-
71
-
72
-
73
-
74
-
75
-
76
-
77
-
78
-
79
-
80
-
81
-
82
-
83
-
84
-
85
-
86
-
87
-
88
-
89
-
90
-
91
-
92
-
93
-
94
-
95
-
96
-
97
-
98
-
99
-
100
-
101
-
102
-
103
-
104
-
105
-
106
-
107
-
108
-
109
-
110
-
111
-
112
-
113
-
114
-
115
-
116
-
117
-
118
-
119
-
120
-
121
-
122
-
123
-
124
-
125
-
 126
126 -
 127
127 -
 128
128 -
 129
129 -
 130
130 -
 131
131 -
 132
132 -
 133
133 -
 134
134 -
 135
135 -
 136
136 -
137
-
138
-
139
-
140
-
141
-
142
-
143
-
144
-
145
-
146
-
147
-
148
-
149
-
150
-
151
-
152
-
153
-
154
-
155
-
156
-
157
-
158
-
159
-
160
-
161
-
162
-
163
-
164
-
165
-
166
-
167
-
168
-
169
-
170
-
171
-
172
-
173
-
174
-
175
-
176
-
177
-
178
-
179
-
180
-
181
-
182
-
183
-
184
-
185
-
186
-
187
-
188
-
189
-
190
-
191
-
192
-
193
-
194
-
195
-
196
-
197
-
198
-
199
-
200
-
201
-
202
-
203
-
204
-
205
-
206
-
207
-
208
-
209
-
210
-
211
-
212
-
213
-
214
-
215
-
216
-
217
-
218
-
219
-
220
-
221
-
222
-
223
-
224
-
225
-
226
-
227
-
228
-
229
-
230
-
231
-
232
-
233
-
234
-
235
-
236
-
237
-
238
-
239
-
240
-
241
-
242
-
243
-
244
-
245
-
246
-
247
-
248
-
249
-
250
-
251
-
252
-
253
-
254
-
255
-
256
-
257
-
258
 |
 |