Toshiba Satellite L350D PSLE0C-SM308C Users Manual Canada; English - Page 84
Using Toshiba Hd Dvd Player
 |
View all Toshiba Satellite L350D PSLE0C-SM308C manuals
Add to My Manuals
Save this manual to your list of manuals |
Page 84 highlights
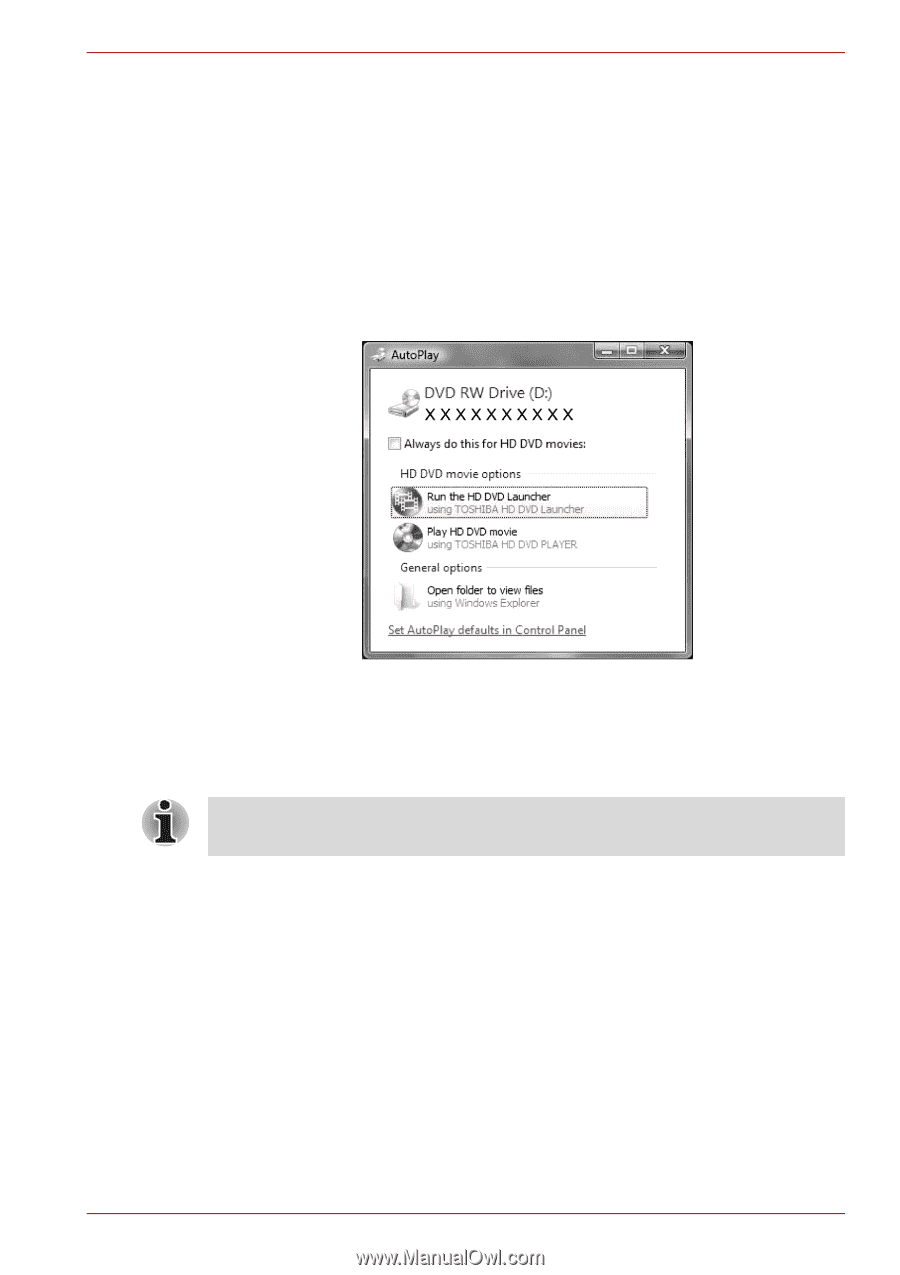
Operating Basics Using TOSHIBA HD DVD PLAYER Starting TOSHIBA HD DVD PLAYER 1. Use the following procedure to start TOSHIBA HD DVD PLAYER. Insert a HD DVD-Video in the HD DVD drive while Windows Vista™ is running. When a HD DVD-Video disc and a HD DVD (Twin format disc) are set in the HD DVD drive, the following application selection screen may appear. If this occurs, select Play HD DVD movie or Run the HD DVD Launcher, then click OK to launch the TOSHIBA HD DVD PLAYER. Figure 4-9 Application selection screen 2. Touch the CD/DVD/HD DVD panel on the Front operation panel. Or select Start → All Programs → TOSHIBA HD DVD PLAYER to start TOSHIBA HD DVD PLAYER. The TOSHIBA HD DVD PLAYER can also be started from the Media Center top menu. Operating TOSHIBA HD DVD PLAYER Notes on Using TOSHIBA HD DVD PLAYER. ■ The HD DVD standard defines A, B, C and D buttons, and some software may display [Press the A button] or similar messages. If a message of this type appears, use the following corresponding keyboard keys. A button: keyboard A key B button: keyboard B key C button: keyboard C key D button: keyboard D key ■ Screen display and available features may vary amongst HD DVDVideos and scenes. User's Manual 4-10
-
 1
1 -
2
-
3
-
4
-
5
-
6
-
7
-
8
-
9
-
10
-
11
-
12
-
13
-
14
-
15
-
16
-
17
-
18
-
19
-
20
-
21
-
22
-
23
-
24
-
25
-
26
-
27
-
28
-
29
-
30
-
31
-
32
-
33
-
34
-
35
-
36
-
37
-
38
-
39
-
40
-
41
-
42
-
43
-
44
-
45
-
46
-
47
-
48
-
49
-
50
-
51
-
52
-
53
-
54
-
55
-
56
-
57
-
58
-
59
-
60
-
61
-
62
-
63
-
64
-
65
-
66
-
67
-
68
-
69
-
70
-
71
-
72
-
73
-
74
-
75
-
76
-
77
-
78
-
 79
79 -
 80
80 -
 81
81 -
 82
82 -
 83
83 -
 84
84 -
 85
85 -
 86
86 -
 87
87 -
 88
88 -
 89
89 -
90
-
91
-
92
-
93
-
94
-
95
-
96
-
97
-
98
-
99
-
100
-
101
-
102
-
103
-
104
-
105
-
106
-
107
-
108
-
109
-
110
-
111
-
112
-
113
-
114
-
115
-
116
-
117
-
118
-
119
-
120
-
121
-
122
-
123
-
124
-
125
-
126
-
127
-
128
-
129
-
130
-
131
-
132
-
133
-
134
-
135
-
136
-
137
-
138
-
139
-
140
-
141
-
142
-
143
-
144
-
145
-
146
-
147
-
148
-
149
-
150
-
151
-
152
-
153
-
154
-
155
-
156
-
157
-
158
-
159
-
160
-
161
-
162
-
163
-
164
-
165
-
166
-
167
-
168
-
169
-
170
-
171
-
172
-
173
-
174
-
175
-
176
-
177
-
178
-
179
-
180
-
181
-
182
-
183
-
184
-
185
-
186
-
187
-
188
-
189
-
190
-
191
-
192
-
193
-
194
-
195
-
196
-
197
-
198
-
199
-
200
-
201
-
202
-
203
-
204
-
205
-
206
-
207
-
208
-
209
 |
 |