Toshiba Satellite P755 PSAY3C-0MK010 Users Manual Canada; English - Page 133
Information, Power Management, Speaker Configuration, Sound Effects, Microphone Effects
 |
View all Toshiba Satellite P755 PSAY3C-0MK010 manuals
Add to My Manuals
Save this manual to your list of manuals |
Page 133 highlights
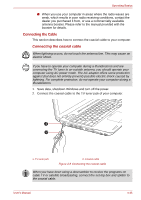
Operating Basics ■ Microphone is the default input device. It should be selected when using the computer's internal microphone or an external microphone connected to the Microphone and Line in jack to record sound. If an external microphone or audio cable is connected to the Microphone and Line in jack, the Realtek HD Audio Manager Connector Settings dialog will be displayed allowing selection of either "Line In" or "Mic In" input. Information Click the information button to view hardware information, software information, and language setting. Power Management The audio controller in your computer can be turned off when the audio function is not used. To adjust the configuration of audio power management, click the battery button . ■ When audio power management is enabled, the circle button at the upper left of the Power Management is blue and convex. ■ When audio power management is disabled, the button is black and concave. Speaker Configuration Click the playback button to confirm the internal speakers or the headphone sound is coming from the right direction. Sound Effects This section explains how to select various sound effects. ■ Environment - simulates reverberations of sound for familiar environments around us. You can select an existing preset in the menu. ■ Equalizer - raises or lowers a frequency of sound to simulate a popular genre of music. You can select an existing preset in the menu. ■ Karaoke - cancels the specific frequency of sound and results in the Vocal Cancellation. Clicking the Karaoke icon, lowers the vocal sound within music. Using the arrow buttons will adjust the musical key of the sound. Microphone Effects Microphone Effects are only found within Microphone window. ■ Noise Suppression reduces background noise and fan noise. ■ Acoustic Echo Cancellation reduces feedback and feedback echo. Default Format You can change the sample rate and bit depth of sound. User's Manual 4-37
-
 1
1 -
2
-
3
-
4
-
5
-
6
-
7
-
8
-
9
-
10
-
11
-
12
-
13
-
14
-
15
-
16
-
17
-
18
-
19
-
20
-
21
-
22
-
23
-
24
-
25
-
26
-
27
-
28
-
29
-
30
-
31
-
32
-
33
-
34
-
35
-
36
-
37
-
38
-
39
-
40
-
41
-
42
-
43
-
44
-
45
-
46
-
47
-
48
-
49
-
50
-
51
-
52
-
53
-
54
-
55
-
56
-
57
-
58
-
59
-
60
-
61
-
62
-
63
-
64
-
65
-
66
-
67
-
68
-
69
-
70
-
71
-
72
-
73
-
74
-
75
-
76
-
77
-
78
-
79
-
80
-
81
-
82
-
83
-
84
-
85
-
86
-
87
-
88
-
89
-
90
-
91
-
92
-
93
-
94
-
95
-
96
-
97
-
98
-
99
-
100
-
101
-
102
-
103
-
104
-
105
-
106
-
107
-
108
-
109
-
110
-
111
-
112
-
113
-
114
-
115
-
116
-
117
-
118
-
119
-
120
-
121
-
122
-
123
-
124
-
125
-
126
-
127
-
 128
128 -
 129
129 -
 130
130 -
 131
131 -
 132
132 -
 133
133 -
 134
134 -
 135
135 -
 136
136 -
 137
137 -
 138
138 -
139
-
140
-
141
-
142
-
143
-
144
-
145
-
146
-
147
-
148
-
149
-
150
-
151
-
152
-
153
-
154
-
155
-
156
-
157
-
158
-
159
-
160
-
161
-
162
-
163
-
164
-
165
-
166
-
167
-
168
-
169
-
170
-
171
-
172
-
173
-
174
-
175
-
176
-
177
-
178
-
179
-
180
-
181
-
182
-
183
-
184
-
185
-
186
-
187
-
188
-
189
-
190
-
191
-
192
-
193
-
194
-
195
-
196
-
197
-
198
-
199
-
200
-
201
-
202
-
203
-
204
-
205
-
206
-
207
-
208
-
209
-
210
-
211
-
212
-
213
-
214
-
215
-
216
-
217
-
218
-
219
-
220
-
221
 |
 |