Toshiba Satellite Pro L640-EZ1411 User Guide - Page 23
Removing an optical disc, Slot-type drive
 |
View all Toshiba Satellite Pro L640-EZ1411 manuals
Add to My Manuals
Save this manual to your list of manuals |
Page 23 highlights
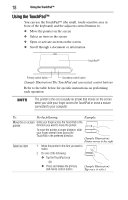
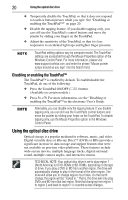
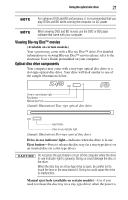
Using the optical disc drive 23 ❖ Slot-type drive: With the label facing up, carefully place the disc partially into the slot until the disc stops or the drive starts pulling the disc in. (Sample Illustration) Positioning the disc in a slot-type drive Use only standard (12 cm) CD or DVD Discs. Any other size or shape disc cannot be removed from this slot and may damage the system. Removing an optical disc If your optical disc drive has a manual eject button, you can remove a disc while the computer is off if necessary (for example, if you cannot turn on the computer because the battery is completely discharged). See "Using the manual eject button" on page 24. Otherwise, the computer must be powered on to eject a disc (follow the procedure below). To remove an optical disc with the computer turned on: 1 Press the eject button on the drive. Do not press the eject button while the drive in-use indicator light is glowing. Doing so could damage the disc or the drive. Also, if the disc is still spinning when you open the disc tray (on a tray-type drive), wait for it to stop spinning before you remove it. 2 Remove the disc from the drive, as indicated below for your drive type: ❖ Tray-type drives: Pull the tray out fully, remove the disc, and then gently press the tray in to close it. ❖ Slot-type drives: Grasp the disc and remove it from the slot. 3 Place the disc in its protective cover.
-
 1
1 -
2
-
3
-
4
-
5
-
6
-
7
-
8
-
9
-
10
-
11
-
12
-
13
-
14
-
15
-
16
-
17
-
 18
18 -
 19
19 -
 20
20 -
 21
21 -
 22
22 -
 23
23 -
 24
24 -
 25
25 -
 26
26 -
 27
27 -
 28
28 -
29
-
30
-
31
-
32
-
33
-
34
-
35
-
36
 |
 |
