Toshiba Satellite U840 PSU4WC Users Manual Canada; English - Page 69
HW Setup, Accessing HW Setup, HW Setup window
 |
View all Toshiba Satellite U840 PSU4WC manuals
Add to My Manuals
Save this manual to your list of manuals |
Page 69 highlights
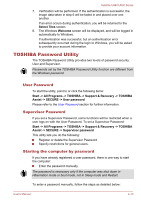
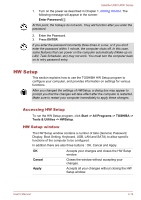
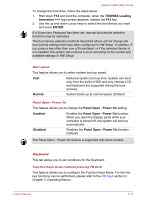
Satellite U840/U800 Series 1. Turn on the power as described in Chapter 1, Getting Started. The following message will appear in the screen: Enter Password [ ] At this point, the hotkeys do not work. They will function after you enter the password. 2. Enter the Password. 3. Press ENTER. If you enter the password incorrectly three times in a row, or if you don't enter the password within 1 minute, the computer shuts off. In this case, some features that can power on the computer automatically (Wake-up on LAN, Task Scheduler, etc) may not work. You must turn the computer back on to retry password entry. HW Setup This section explains how to use the TOSHIBA HW Setup program to configure your computer, and provides information on settings for various functions. After you changed the settings of HWSetup, a dialog box may appear to prompt you that the changes will take effect after the computer is restarted. Make sure to restart your computer immediately to apply these changes. Accessing HW Setup To run the HW Setup program, click Start -> All Programs -> TOSHIBA -> Tools & Utilities -> HWSetup. HW Setup window The HW Setup window contains a number of tabs (General, Password, Display, Boot Setting, Keyboard, USB, LAN and SATA) to allow specific functions of the computer to be configured. In addition there are also three buttons : OK, Cancel and Apply. OK Accepts your changes and closes the HW Setup window. Cancel Closes the window without accepting your changes. Apply Accepts all your changes without closing the HW Setup window. User's Manual 4-14
-
 1
1 -
2
-
3
-
4
-
5
-
6
-
7
-
8
-
9
-
10
-
11
-
12
-
13
-
14
-
15
-
16
-
17
-
18
-
19
-
20
-
21
-
22
-
23
-
24
-
25
-
26
-
27
-
28
-
29
-
30
-
31
-
32
-
33
-
34
-
35
-
36
-
37
-
38
-
39
-
40
-
41
-
42
-
43
-
44
-
45
-
46
-
47
-
48
-
49
-
50
-
51
-
52
-
53
-
54
-
55
-
56
-
57
-
58
-
59
-
60
-
61
-
62
-
63
-
 64
64 -
 65
65 -
 66
66 -
 67
67 -
 68
68 -
 69
69 -
 70
70 -
 71
71 -
 72
72 -
 73
73 -
 74
74 -
75
-
76
-
77
-
78
-
79
-
80
-
81
-
82
-
83
-
84
-
85
-
86
-
87
-
88
-
89
-
90
-
91
-
92
-
93
-
94
-
95
-
96
-
97
-
98
-
99
-
100
-
101
-
102
-
103
-
104
-
105
-
106
-
107
-
108
-
109
-
110
-
111
-
112
-
113
-
114
-
115
-
116
-
117
-
118
-
119
-
120
-
121
 |
 |