Toshiba TDP-TW90A Owners Manual - Page 25
Checking the projector status, Installing the applications
 |
View all Toshiba TDP-TW90A manuals
Add to My Manuals
Save this manual to your list of manuals |
Page 25 highlights
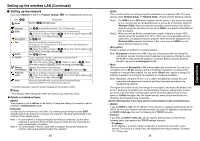
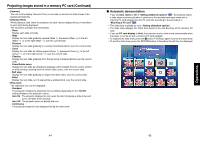
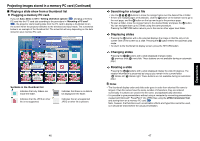
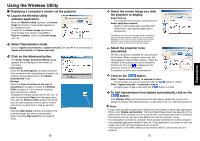
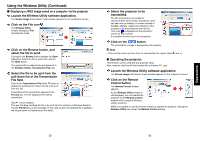
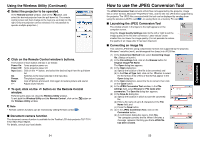
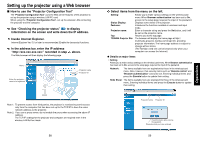
Checking the projector status ■ Status display To check the current status of the projector, select Status display in step 2 in "Projector settings" p.36 . The following items of information will then be displayed. The name of the application currently running on the projector is displayed. (Examples: Slide Show, Wireless Utility) When no card is plugged ➔ "Type" is displayed. When a memory PC card is plugged ➔ "Type/Free space/Status" are displayed. When a wireless LAN PC card is plugged ➔ "Type/MAC address/DHCP/IP address/ Subnet mask/Gateway" are displayed. The firmware version number of the wireless/card feature is displayed. Note • This product contains a piece of software (hereafter the Software) licensed to TOSHIBA CORPORATION (hereafter TOSHIBA) by AXE, Inc. (hereafter AXE). The copyright and other intellectual property rights of the software are held by AXE or the licensor. The software is protected by the Copyright Law, Universal Copyright Convention, and other intellectual property laws and agreements. The permission of AXE or the licensor must therefore be obtained before the software can be reproduced. Note, however, that the software is partly covered under the GNU General Public License Version 2 (hereafter GPL2). You can obtain a copy of GPL2 at http://www.fsf.org/copyleft/ gpl.html. AXE will provide the GPL-covered source code of the software in accordance with the terms of GPL2. Contact AXE if you need it. An OS of axLinux is a registered trademark of AXE, Inc. Installing the applications If you will use the wireless LAN PC card function, install the application on the supplied CD-ROM onto your computer. ■ System Requirements Supported OS: Windows® 2000, Windows® XP CPU: Pentium III 750 MHz or higher recommended RAM: 256 MB or more recommended Screen area (resolution): 1024 by 768 pixels recommended ■ Application Types and Major Functions Wireless Utility This application is used for wireless connections. Use it to send the images from the computer's screen to your projector, and display on the screen. JPEG Conversion Tool Use to convert JPEG and other files into a format that can be displayed as a slide show using a memory PC card. ■ How to install In the supplied CD-ROM, select the Applications folder, and run setup.exe. Follow the instructions on your computer screen. During the installation, a dialog box may appear with the message "Digital Signature Not Found" and the prompt "Do you want to continue the installation?". Click on the [Yes (Y)] button to continue the installation. When installation is finished, the following shortcuts will appear on your computer's desktop: Wireless Utility → Operations p.50 JPEG Conversion Tool → Operations p.55 ■ How to uninstall Select [Start Menu] → [Settings] → [Control Panel] → [Add/Remove Programs], and remove Toshiba Data Projector from currently installed programs. Note • Your computer screen may temporarily go out during installation, but it is not an error. Operations 48 49
-
 1
1 -
2
-
3
-
4
-
5
-
6
-
7
-
8
-
9
-
10
-
11
-
12
-
13
-
14
-
15
-
16
-
17
-
18
-
19
-
 20
20 -
 21
21 -
 22
22 -
 23
23 -
 24
24 -
 25
25 -
 26
26 -
 27
27 -
 28
28 -
 29
29 -
 30
30 -
31
-
32
-
33
-
34
-
35
-
36
-
37
 |
 |
