Toshiba Tecra A3-S611 Maintenance Manual - Page 119
Optical Drive Module, Removing the Optical Drive Module
 |
View all Toshiba Tecra A3-S611 manuals
Add to My Manuals
Save this manual to your list of manuals |
Page 119 highlights
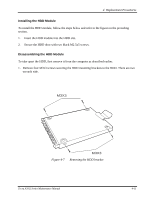
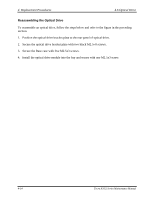
4 Replacement Procedures 4.5 Optical Drive Module Removing the Optical Drive Module To remove the optical drive module, you need to remove the HDD module first. Follow the steps below: 1. Turn the computer upside down. 2. Remove one M2.5x3 screw securing the optical drive module into place. 3. Slide the Slim Select Bay latch to unlock position. 4. Grasp the optical drive module and slide it out. 1 M2.5 X 3 2 Slim Select Bay latch 3 Figure 4-8 Removing the optical drive module Installing the Optical Drive Module To install a device in the optical drive module bay, follow the steps below and refer to the figure in the preceding section. 1. Slide the device into the optical drive module bay. 2. Use one M2.5x3 screw to secure it in position. 3. Slide the Slim Select Bay latch to lock position. 4-12 Tecra A3/S2 Series Maintenance Manual
-
 1
1 -
2
-
3
-
4
-
5
-
6
-
7
-
8
-
9
-
10
-
11
-
12
-
13
-
14
-
15
-
16
-
17
-
18
-
19
-
20
-
21
-
22
-
23
-
24
-
25
-
26
-
27
-
28
-
29
-
30
-
31
-
32
-
33
-
34
-
35
-
36
-
37
-
38
-
39
-
40
-
41
-
42
-
43
-
44
-
45
-
46
-
47
-
48
-
49
-
50
-
51
-
52
-
53
-
54
-
55
-
56
-
57
-
58
-
59
-
60
-
61
-
62
-
63
-
64
-
65
-
66
-
67
-
68
-
69
-
70
-
71
-
72
-
73
-
74
-
75
-
76
-
77
-
78
-
79
-
80
-
81
-
82
-
83
-
84
-
85
-
86
-
87
-
88
-
89
-
90
-
91
-
92
-
93
-
94
-
95
-
96
-
97
-
98
-
99
-
100
-
101
-
102
-
103
-
104
-
105
-
106
-
107
-
108
-
109
-
110
-
111
-
112
-
113
-
 114
114 -
 115
115 -
 116
116 -
 117
117 -
 118
118 -
 119
119 -
 120
120 -
 121
121 -
 122
122 -
 123
123 -
 124
124 -
125
-
126
-
127
-
128
-
129
-
130
-
131
-
132
-
133
-
134
-
135
-
136
-
137
-
138
-
139
-
140
-
141
-
142
-
143
-
144
-
145
-
146
-
147
-
148
-
149
-
150
-
151
-
152
-
153
-
154
-
155
-
156
-
157
-
158
-
159
-
160
-
161
-
162
-
163
-
164
-
165
-
166
-
167
-
168
-
169
-
170
-
171
-
172
-
173
-
174
-
175
-
176
-
177
-
178
-
179
-
180
-
181
-
182
-
183
-
184
-
185
-
186
-
187
-
188
-
189
-
190
-
191
-
192
-
193
-
194
-
195
-
196
-
197
-
198
-
199
-
200
-
201
-
202
 |
 |
